Document generation using API: Create and automate an NDA Flow for a new employee using simple API calls

The document generation market is expected to reach USD 2.4 billion by 2030, growing at a CAGR of 9.54% from 2023 to 2030. Companies are ready to invest in document generation software due to its ability to increase the efficiency of an organization as well as its level of customer satisfaction.
airSlate has developed Document Automation Hub, a comprehensive suite of workflow automation APIs for organizations whose needs go beyond just eSignature and are looking to fully automate their document processes within their applications. Document Automation Hub seamlessly combines features like PDF editing, document generation, data collection, eSignature, and web forms to potentially transform the development process and boost productivity for technology teams.
airSlate’s workflow automation APIs empower even non-tech-savvy users to integrate document generation functionality into their native software – websites, CRMs, and custom applications. Citizen developers can use well-documented endpoints to create pre-filled documents, distribute them among recipients, and save executed documents to the cloud.
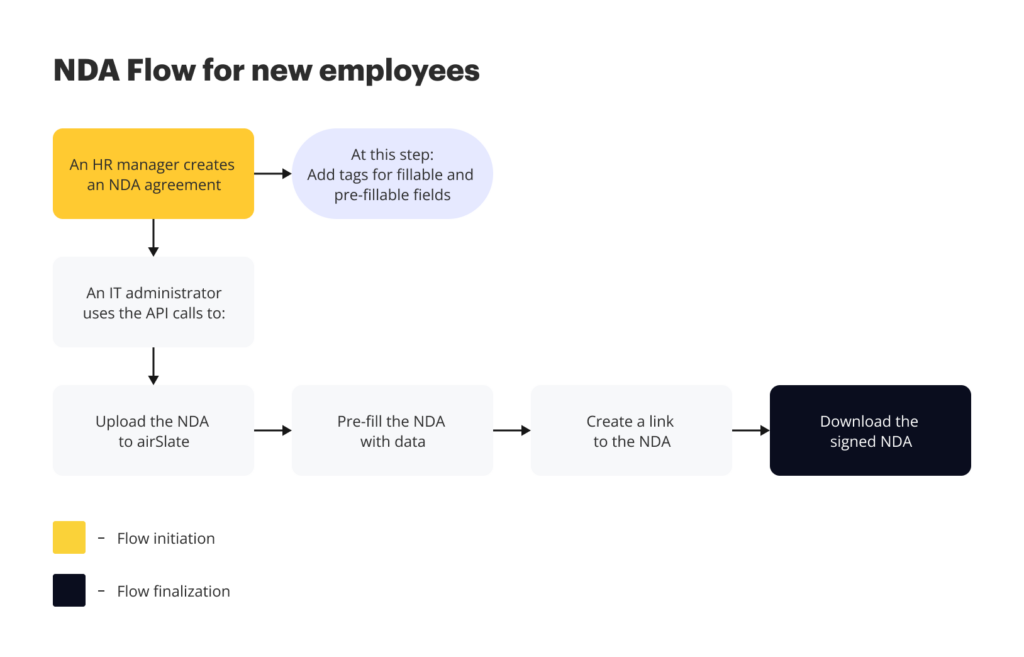
In this article, we’ll demonstrate how your IT professional or System administrator can create and automate an NDA Flow for a new employee using simple API calls.

Getting started
To start working with the airSlate API you’ll need to register an airSlate account. Follow the simple process on the homepage, and then log in to the dashboard to create an integration.
Create a DOCX document in the online editor of your choice (for example, Google Docs) and insert text tags. You can add tags for fillable fields [recipients can enter their data there] and pre-fillable, aka merge, fields [recipients can not edit or modify them].
| Example of text tags for fillable fields | Example of text tags for pre-fillable fields | ||
|---|---|---|---|
| Text field | {{t:t;r:n;l:”text_field_1″;}} | Insert text | {{FieldName}} |
| Signature field | {{t:s;r:n;l:”signature_field_1″;}} | Insert table | {{table}} {{ColumnField1}} {{ColumnField2}} {{endtable}} |
| Initials | {{t:i;r:n;l:”initials_field_1″;w:200;}} | List | {{for(ListName)}} List Element Field1: {{Field1Name}} List Element Field2: {{Field2Name}} {{endfor}} |
| Checkbox | {{t:c;r:n;l:”checkbox_field_1″;}} | Add conditional logic | {{if(ConditionFieldName=‘Value1’)}} Output 1 {{else((ConditionFieldName=‘Value2’)}} Output 2 {{endif}} |
| Dropdown | {{t:d;r:n;l:”Dd_field_1″;dd:first option,second option,third option;w:200;}} | Insert image | {{imageFile(FieldName)}} |
| Date | {{t:dt;r:n;l:”date_field_1″;w:150;p:”DD/MM/ YYYY”;}} | Insert HTML content | {{html:FieldName}} |
Once a document has been generated from a DOCX template, any text tags added to your document are automatically converted into fillable fields or pre-filled with data.
Note: If you add multiple tags for pre-fillable fields with the same name, they will be populated with the same data.
2. Get your access token
Before making API calls, API users need to obtain an access token using one of the available authentication grant types:
- Code Grant
- JWT Grant
- Implicit Grant
Depending on your grant type, make an API request to authorize your application to access the API server.
3. Create an Organization
Once you have your access token, make an API call to create an Organization – an environment where you and your team create documents and forms, manage and collaborate on Templates and Flows, manage user subscriptions, and more.
Note: Organization equals a Workspace in your airSlate account.
Use the POST/organizations endpoint. Once the Organization is ready, you can start your document generation magic.
4. Create a Template
Use the POST /organizations/{{organization_id}}/templates endpoint to create a new Template where you will upload your DOCX file with tags. In the parameters, indicate the ID of the Organization (Workspace) in which you intend to create a Template.
Request example
curl
--request POST \
--url https://api.airslate.io/v1/organizations/{{organization_id}}/templates \
--header 'Authorization: Bearer {{access_tocken}}' \
--header 'Content-Type: application/json' \
--data '{
"name": "NDA",
"description": "DocGen Template"
"redirect_url": "https://www.pdffiller.com/?mode=view"
}'
Response example
{
"id": "7FD5D6C5-8000-0000-0000BA28",
"name": "NDA",
"description": "DocGen Template",
"created_at": "2019-10-10T12:00:00Z",
"updated_at": "2021-10-10T12:00:00-01",
"last_activity": "2019-10-10T12:00:00+05:00"
}
Tip: You can add a redirect link to the API request. With the redirect link, your recipients will be redirected to the website of your choice after completing the document.
5. Upload documents to the Template
Now we will upload a DOCX file with tags to the Template. Use the POST /templates/{{template_id}}/documents endpoint to upload documents. In the request body, indicate DOC_GENERATION as the uploaded document type.
Note: to upload your DOCX via an API request, you need to convert the document’s content to the base64 format using https://base64.guru/converter/encode/pdf.
Request example
curl
--request POST \
--url https://api.airslate.io/v1/organizations/{{organization_id}}/templates/{{template_id}}/documents \
--header 'Authorization: Bearer {{access_tocken}}' \
--header 'Content-Type: application/json' \
--data '{
"name": "NDA.pdf",
"type": "DOC_GENERATION",
"content": "base64 content"
}'
Response example
{
  "id": "28400000-0000-0000-000000F6",
  "name": "NDA",
  "type": "DOC_GENERATION",
  "created_at": "2019-10-10T12:00:00Z",
  "updated_at": "2021-10-11T17:32:28+05:00",
  "fields": [
   {
           "id": "A57C5ABF-DA20-0000-000021F6-0001",
           "type": "date",
           "name": "date_field_1",
           "value": null,
           "placeholder": ""
       },
       {
           "id": "A57C5ABF-DA20-0000-000021F6-0002",
           "type": "signature",
           "name": "signature_field_1",
           "value": null,
           "placeholder": ""
       },
       {
           "id": "A57C5ABF-DA20-0000-000021F6-0004",
           "type": "text",
           "name": "CompanyName",
           "value": null,
           "placeholder": ""
       }
    ]
}
The response returns information about the document and the data array for fillable fields, including the field’s type, name, and ID.
6. Pre-fill your DOCX with data
Use the PATCH /templates/{{template_id}}/documents/{{document_id}} endpoint to pre-fill your document with data.
The request body contains the fields’ data array: field type, field name, and field value (will be pre-filled with the data you need).
Request example
curl
--request PATCH \
--url https://api.airslate.io/v1/organizations/{{organization_id}}/templates/{{template_id}}/documents/{{document_id}} \
 --header 'Authorization: Bearer {{access_tocken}}' \
 --header 'Content-Type: application/json' \
 {
   "fields": [
       {
           "id": "A57C5ABF-DA20-0000-000021F6-0001",
           "type": "date",
           "name": "date_field_1",
           "value": null,
           "placeholder": ""
       },
       {
           "id": "A57C5ABF-DA20-0000-000021F6-0002",
           "type": "signature",
           "name": "signature_field_1",
           "value": null,
           "placeholder": ""

       },
       {
           "id": "003020B9-FA20-0000-000021F6-0004",
           "type": "text",
           "name": "CompanyName",
           "value": "SunnyGlasses",
           "placeholder": ""
       }
    ]
}
Response example
{
   "data": [
       {
           "id": "003020B9-FA20-0000-000021F6-0001",
           "type": "date",
           "name": "date_field_1",
           "value": null,
           "placeholder": ""
       },
       {
           "id": "003020B9-FA20-0000-000021F6-0002",
           "type": "signature",
           "name": "signature_field_1",
           "value": null,
           "placeholder": ""
       },
       {
           "id": "003020B9-FA20-0000-000021F6-0004",
           "type": "text",
           "name": "CompanyName",
           "value": "SunnyGlasses",
           "placeholder": ""
       }
   ]
As a result, the fields in the NDA are pre-filled with the required information.
Tip: With airSlate, you can populate text tags in your DOCX file with content from external sources such as Salesforce, MS Dynamics 365, NetSuite, Google Sheets, MS Excel 365, Airtable, Smartsheet, MySQL, and many others.
7. Create a Flow
Now let’s create a Flow based on the pre-filled NDA to share it with recipients.
Use the POST /templates/{{template_id}}/flows endpoint to create a Flow. The body of the request contains the documents in the Template and an array of fields.
Request example
curl
--request POST \
--url https://api.airslate.io/v1/organizations/{{organization_id}}/templates/{{template_id}}/flows \
--header 'Authorization: Bearer {{access_token}}' \
--header 'Content-Type: application/json' \
--data '{
"documents":[
       {
           "id": "003020B9-FA20-0000-000021F6",
           "fields": [
               {
                   "id": "003020B9-FA20-0000-000021F6-0001",
                   "type": "date",
                   "name": "date_field_1",
                   "value": null,
                   "placeholder": ""
               },
               {
                   "id": "003020B9-FA20-0000-000021F6-0002",
                   "type": "signature",
                   "name": "signature_field_1",
                   "value": null,
                   "placeholder": ""
               },
               {
                   "id": "003020B9-FA20-0000-000021F6-0004",
                   "type": "text",
                   "name": "CompanyName",
                   "value": "SunnyGlasses",
                   "placeholder": ""
               }
           ]
       }
   ]
}
Response example
{
   "id": "FFE6588E-4210-0000-0000C9C1",
   "name": "Anna Green's NDA Flow",
   "status": "ACTIVE",
   "documents_count": 1,
   "available_roles": [
       {
           "id": "A9C880CA-6130-0000-0000055A",
           "name": "Employee"
       }
   ],
   "created_at": "2022-12-27T09:08:30Z",
   "updated_at": "2022-12-27T09:08:35Z",
   "last_activity": "2022-12-27T09:08:34Z"
}
As a result, we get information about the newly created Flow and all available roles with the IDs. We’ll use the role IDs for the next request.
Use the POST /templates/{{template_id}}/flows/{{flow_id}}/share endpoint to create a shareable link. In the body parameters, indicate the role ID for each recipient from the previous response.
Request example
curl
--request POST \
--url https://api.airslate.io/v1/organizations/{{organization_id}}/templates/{{template_id}}/flows/{{flow_id}}/share \
--header 'Authorization: Bearer {{access_tocken}}' \
--header 'Content-Type: application/json' \
--data '{
"data": [
  {
    "auth_method": "none",
    "expire": 60,
    "role_id": "A9C880CA-6130-0000-0000055A"
  }
]
}'
Response example
{
   "data": [
       {
           "role_id": "A9C880CA-6130-0000-0000055A",
           "url": "https://redirect.airslate.io/as/flow/4194451a-9b59-4e90-a23a-0452a88ee175",
           "auth_method": "none",
           "is_activated": true,
           "expiration_at": "2022-12-28T02:55:15Z",
           "created_at": "2022-12-27T10:15:15Z",
           "updated_at": "2022-12-27T10:15:15Z"
       }
   ]
}
As a result, we get a link to the NDA Flow.
Note: The number of links depends on the number of roles in a Flow. Each role has a separate shareable link.
Now let’s distribute the link to the Flow with recipients using the available options:
- Embed the link to your Flow into the iframe so that a recipient can open and sign the document on your website.
- Embed the link to the Welcome form and send it via email.
- Share the link via any messenger.
10. Get notified once your documents have been signed
Subscribe to the Flow’s completion event. Use the POST/subscriptions endpoint to create a new event subscription.
In the request, you have to name the event and define the Template ID and callback URL, which will receive the notification about the event completion.
Request example
curl
--request POST \
  --url https://api.airslate.io/v1/subscriptions \
  --header 'Authorization: Bearer {{access_tocken}}' \
  --header 'Content-Type: application/json' \
  --data '{
  "event_name": "NDA.signed",
  "entity_id": "C2D1D654-0100-0000-0000BA40.",
  "entity_type": "template",
  "callback": {
    "url": "http://apicallbacks.pdffiller.com/handle?hash=a75cb8d8"
  }
}'
Response example
{
  "id": "5c74677b-86ed-4d8e-8a0c-38d96ef40c5a",
  "event_name": "flow.completed",
  "app_id": "C2D1D654-0100-0000-0000BA11",
  "entity_id": "C2D1D654-0100-0000-0000BA37",
  "entity_type": "template",
  "created": "2022-03-06T18:12:56.283105Z",
  "updated": "2022-03-06T18:12:56.283105Z",
  "callback": {
    "url": "http://apicallbacks.pdffiller.com/handle?hash=a75cb8d8"
  }
}
11. Download signed documents
Once your recipients have signed documents in the Flow, you can download the documents as an archive. Use the GET/organizations/{{organization_id}}/templates/{{template_id}}/flows/{{flow_id}}/download endpoint.
Response example
curl
--request GET \
--url https://api.airslate.io/v1/organizations/{{organization_id}}/templates/{{template_id}}/flows/{{flow_id}}/download \
  --header 'Accept: ' \
  --header 'Authorization: Bearer {{access_tocken}}' \
  --header 'Content-Type: application/json'
If words are not enough, watch how to generate documents and distribute your Flow via the airSlate API in the video tutorial:
- Getting started
- 1. Create a DOCX with tags
- 2. Get your access token
- 3. Create an Organization
- 4. Create a Template
- 5. Upload documents to the Template
- 6. Pre-fill your DOCX with data
- 7. Create a Flow
- 8. Create shareable links to the Flow
- 9. Share the link with the recipients
- 10. Get notified once your documents have been signed
- 11. Download signed documents

