Forms — ugh. Managing form workflows and data is a tedious and repetitive task. Fortunately, airSlate’s Document Automation Hub API enables developers to build end-to-end document automation services that support the inclusion of forms. The steps in the workflow involving forms can be integrated with steps involving PDFs and other types of documents.
airSlate is regularly recognized as a provider of some of the best document automation software. Its form automation services are used by numerous companies and organizations, who can testify to their effectiveness. The UK-based swimming school In at the Deep End (IATDE), for example, automates its sign-up and birthday party reservation processes with airSlate. Its new sign-up process includes the pre-filling of forms with participant data and the automatic saving of forms. Its new birthday party reservation process automatically keeps track of which time slots are available. IATDE has saved money and time on paperwork, and quickly built a system customers have described as forward-thinking.

Another example is T2 Biosystems, a company specializing in in-vitro diagnostics. airSlate literally helps them saves patient lives with form processing. The ability to save partly completed forms reduces their back-and-forth, speeding up diagnosis and treatment in the hospitals that use T2 Biosystems’ technologies.
Want to create mobile-friendly no-code web forms using airSlate’s drag-and-drop editor? This post is all you need. Our tutorial will show you how to create forms with the Document Automation Hub APIs, and how to use the Document Automation Hub so processing your forms is easy as pie.
For the purpose of the tutorial, let’s create an app for booking a picnic area, to run on your local server.
Booking the Picnic Area
The application to book the picnic area will include forms, PDFs, and eSignatures. To make the booking:
- The user fills out a web form.
- After submitting the form, the user signs a waiver sent in an email.
- A park staff member signs that they have reviewed the full application, and indicates whether the application has been approved.
- The waiver is stored on the park facility’s server as a PDF.
The application will run on your local machine using Python’s SimpleHTTPServer. To use SimpleHTTPServer, you will need to have Python installed — this tutorial uses Python 3. To use the Document Automation Hub APIs, you will also need a registered Document Automation Hub account.
Setting up the Local Server
In the directory of your choice on your local machine, create a folder called picnic_area containing two files: index.html and thankyou.html.
We’re leaving the file index.html blank for now. Later, we will embed the first form in our document automation process into that page. Submission of that form will redirect you to thankyou.html. Put the following code in thankyou.html. It’s based on Andy Brewer’s MVP template, and you could probably copy and paste it. Here’s the code:
<!-- MVP.css quickstart template: https://github.com/andybrewer/mvp/ -->

<!DOCTYPE html>
<html lang="en">

<head>
   <link rel="icon" href="https://via.placeholder.com/1x1">
   <link rel="stylesheet" href="https://unpkg.com/mvp.css">

   <meta charset="utf-8">
   <meta name="description" content="Landing page after submitting first part of application to reserve picnic area">
   <meta name="viewport" content="width=device-width, initial-scale=1.0">

   <title>Thank you!</title>
</head>

<body>
   <header>
       <h1>Thank you for your interest in booking the Blue Hills Park picnic area!</h1>
       <p>You will be emailed a waiver to sign.</p>
       <p>Upon signing and sending the waiver, you will hear from a park staff member within three business days.</p>
       <p>They will let you know if your application has been approved.</p>
   </header>
   <main>
           <!-- Image source: NewtonCourt, CC BY-SA 4.0 https://creativecommons.org/licenses/by-sa/4.0, via Wikimedia Commons -->
           <img alt="blue-hills-park" src="https://upload.wikimedia.org/wikipedia/commons/8/87/Blue_Hills_P1140207.jpg" style="display: block;margin-left: auto;margin-right: auto;width: 80%;" />
   </main>
   <footer>
       <hr />
       <p>
           <small>
               Questions? Contact airSlate at <a href="https://www.airslate.com/contact?utm_medium=article&utm_source=blog&utm_campaign=document_automation_hub_api&utm_content=10_2023-Forms_API_An_Easy_to_Use_API_for_Mobile-Friendly_Web_Forms&utm_term=thankyou_page">this link</a>.
           </small>
       </p>
   </footer>
</body>
</html>
In the main picnic_area directory, run the local server on the command line. My local machine is a Mac, and my command is as follows:
$ python3 -m http.serverOnce the server starts, navigate in your browser to http://localhost:8000/thankyou.html, and the page should look like this:
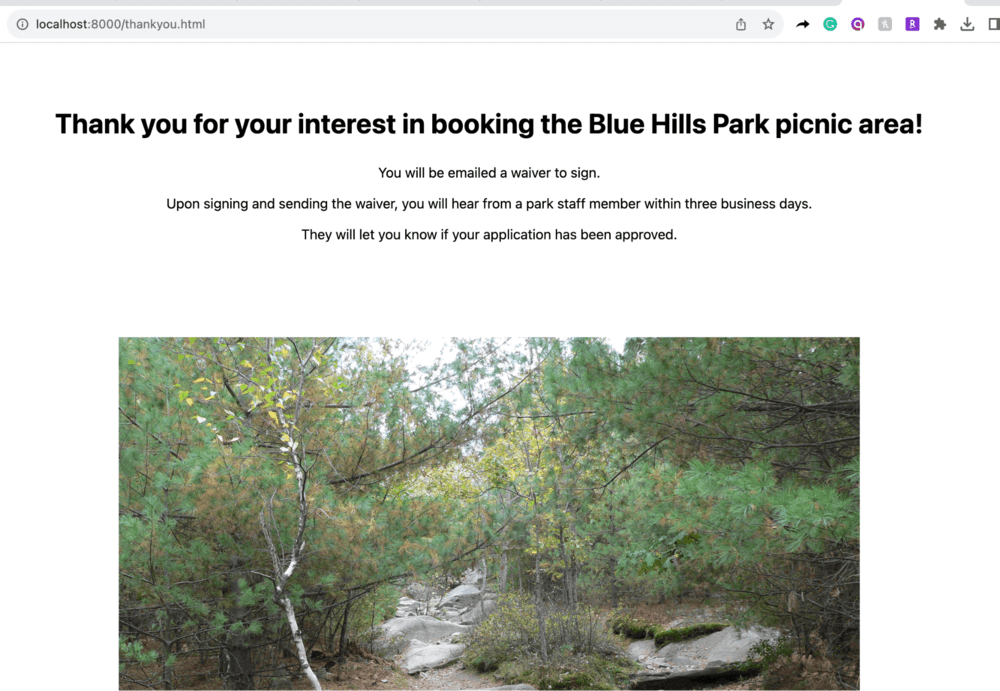
Now you have some nice pages to embed your forms in and redirect the user to on completion, so we will switch to building the actual document automation processes.
Authenticating with the API
It’s time to set up the API so you can make your first Document Automation Hub API requests. Go to the dashboard of your Document Automation Hub account and create a new application with the “Add Application” button on the top left, as shown below:
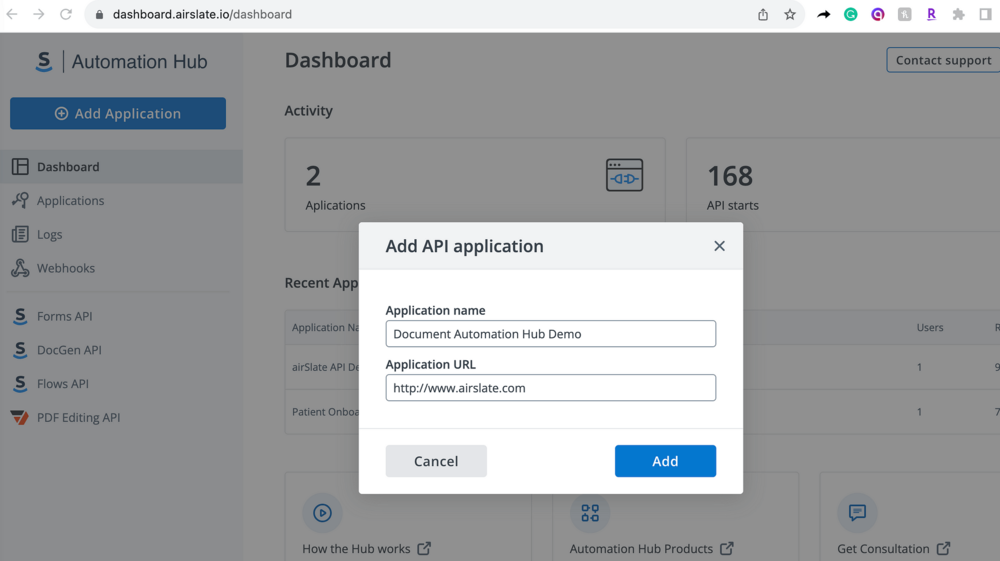
The application name is unimportant as long as you remember it. It should also be unique. Here, I’m naming it “Document Automation Hub Demo.” The application URL is even less important for this application, and I’m pointing it to the airSlate domain.
Once the application is created, click on its name where it appears on the Document Automation Hub account dashboard. You will get to a page that, going forward, this tutorial will call the application page. It shows the client ID; client secret; application URL; and “Code Grant,” “JWT Grant,” “Implicit Grant,” and “Password Grant” tabs.
The next step is to get an authorization code for a Code Grant. A Code Grant is a type of authorization grant that requires the user to agree for you to access user data. It also includes extra verification steps that the client is who it says it is.
Here, you will be accessing data on the park facility’s private workspace, and sending private, legally binding data such as personally identifiable information and eSignatures. This calls for a more secure type of grant. You can read the full documentation for how to get a Code Grant here or watch this video.
You need to use the authorization code to get the bearer token, valid for two days. The request for the bearer token can be copied from the application page. In the request, you must enter the redirect URI, client ID, client secret, and authorization code. Since the first three are copied automatically, the authorization code is the only part you must copy manually.
When you have successfully obtained the bearer token, copy and save the string called access_token which you receive in your response. The access token will enable you to authenticate your Document Automation Hub API requests.
Bug Note: When you copy the URL “Link to get the authorization code” from the application page and enter that URL in the browser, you will be asked to enter a username and password. At that point, you may sign in with another service, such as Google or Apple, to get the authorization code rather than manually entering your username and password. If you do so, then when you use the authorization code to try and get the bearer token, you may get this error — even if you do correctly decrypt the authorization code:
{“error”:”invalid_request”,”error_description”:”The request is missing a required parameter, includes an invalid parameter value, includes a parameter more than once, or is otherwise malformed.”,”hint”:”Cannot decrypt the authorization code”,”message”:”
The request is missing a required parameter, includes an invalid parameter value, includes a parameter more than once, or is otherwise malformed.”}
This error is a known bug. You can avoid it by entering the username and password manually. If you cannot, you should contact airSlate Customer Support, describing the issue, to get proper access.
Creating the Park Facility’s Workspace
Now that you can authenticate, it’s time to build the document automation capabilities using the Document Automation Hub API. First, you will create the park facility’s workspace as an organization that can store and run its own document workflow automation processes.
For one-off requests, the most convenient way to use the Document Automation Hub API is by running it on the production server, on the page of the documentation itself. To create the park facility, go to this “Create a new Organization” page, enter your access_token in the “Token” field of “Auth,” specify that the API request is going to the production server, and enter the following in “Body”:
{
 "name": "Blue Hills Park",
 "subdomain": "blue-hills-park",
 "category": "LEISURE_AND_HOSPITALITY",
 "size": "6-50"
}
On the API documentation page, the request will look like this:
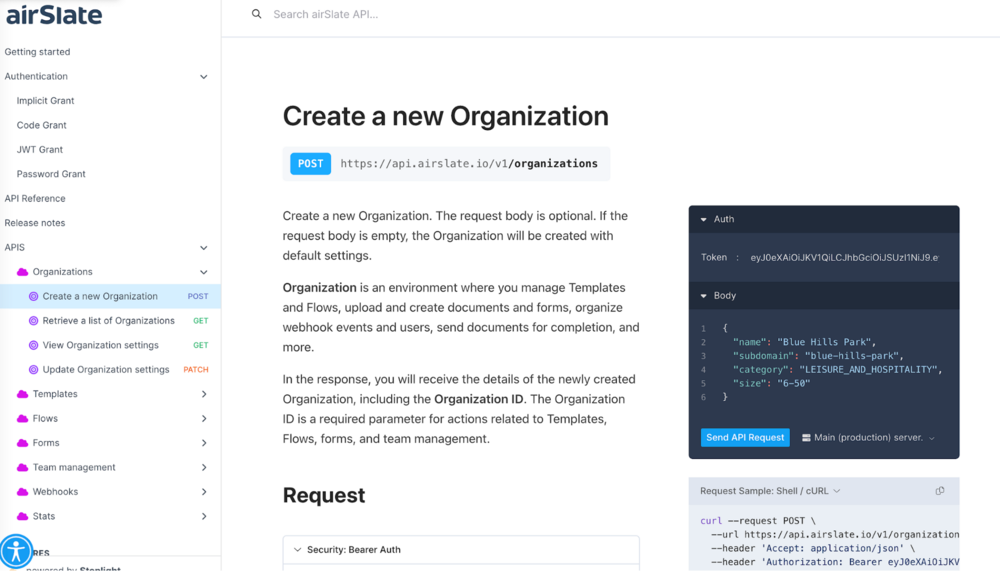
Once you finish forming your request, click “Send API Request.” If the response successfully creates the organization, save the organization ID, which you will use in future requests.
If the subdomain is taken, you will receive a 422 “Unprocessable Entity” error as a response and will need to enter another subdomain. Although the application built in this tutorial uses the subdomain “blue-hills-park,” it should not be a big deal to use another.
The Document Automation Hub API Guide’s pages for specific requests also include the code for making each request in various programming languages — cURL, HTTPie, WGet, Python3, the Requests library of Python, JavaScript, Node, Go, C, Objective-C, OCaml, C#, Java, HTTP/1.1, Clojure, Kotlin, PHP, Powershell, R, Ruby, and Swift. So, you can embed API calls into almost any existing piece of code.
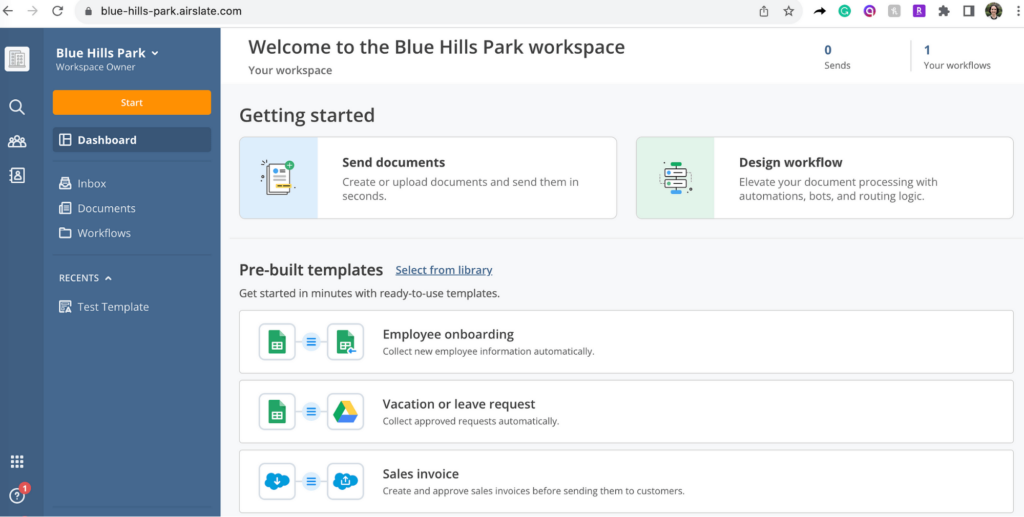
And now, if you go via browser to the subdomain you indicated in your request — for this tutorial, https://blue-hills-park.airslate.com/ — you will see an actual, empty workspace. Time to add some document automation.
Organizations, Templates, and Flows
The workspace is described as the Organization in the API documentation. To enable the document flow automation, you need to make additional Document Automation Hub API requests to create structures within the workspace, which are called Templates and Flows.
A Template is a group of fillable documents and forms that can be sent to recipients for completion. Since Templates require all their forms to be included when they are sent to a recipient, we will create two Templates, one containing the initial booking form and the other containing the waiver form. The waiver form is only sent after submitting the initial booking form.
A Flow is a single run of the standard back-and-forth process for a Template’s documents and forms. For example, each time a person is hired, they might receive a different copy of the standard employment contract. A new Flow might be created for each new hire to send the contract to the new employee and their manager for signature.
We will create a single Flow in the initial booking Template for all users to fill out the form. We will create a new Flow in the waiver Template for each time the waiver form is sent out.
Creating the Templates
The next step is to create the two Templates for holding the Documents. Go to “Create a new Template” in the documentation. Fill in your access_token in “Token” and your organization ID in “organization_id.” For the initial booking Template, send the API request to the production server with the following body:
{
“name”: “Picnic Area Reservations”,
“description”: “Application for reserving picnic area”,
“redirect_url”: “http://localhost:8000/thankyou.html"
}
Make sure the redirect_url is set to the “thankyou” page of the local server you created, where the user will be redirected when the initial booking form is submitted.
For the waiver Template, send the API request to the production server with the following body:
{
“name”: “Facility Use Waiver”,
“description”: “Signable waiver of liability”,
“redirect_url”: "https://www.mass.gov/locations/blue-hills-reservation"
}
Make sure you save both Template IDs for future API calls. Or, you can get a list of Templates in your Organization here.
The Booking Form
In airSlate, it is possible to either create a form yourself or upload and edit a pre-existing form. Forms and other documents can be built or edited in the drag and drop form designer. Forms can also be built using the API, which we will do for the initial booking form in this tutorial.
The API supports the creation of many different types of form fields. We will use several of these, including single-line text, multi-line text, email, phone number, and date.
Go to “Create a web form” in the documentation. Put your access_token in “Token,” your organization ID in “organization_id,” and your “Picnic Area Reservations” template ID in “template_id.”
Replace the sample code in “Body” with the code below, which you can probably just copy and paste. Then click “Send API Request” to the production server. Upon a successful response, save the ID of the form you have created.
{
“name”: “Booking Form”,
“fields”: [
{
“name”: “Picnic Area Reservation Application”,
“type”: “heading”,
“description”: “Thank you for your interest in the Blue Hills Picnic Area! Please fill out this form to reserve it.”,
“title”: “Picnic Area Reservation Application”,
“page”: “page1”
}, {
“name”: “Full Name”,
“type”: “text”,
“title”: “Full Name”,
“value”: null,
“placeholder”: “”,
“page”: “page1”
}, {
“name”: “Billing Address”,
“type”: “text”,
“title”: “Billing Address”,
“value”: null,
“placeholder”: “”,
“page”: “page1”
}, {
“name”: “City State Zip”,
“type”: “text”,
“title”: “City, State, Zip”,
“value”: null,
“placeholder”: “”,
“page”: “page1”
}, {
“name”: “Email Address”,
“type”: “email”,
“title”: “Email Address”,
“value”: null,
“placeholder”: “”,
“page”: “page1”
}, {
“name”: “Phone Number”,
“type”: “phone”,
“title”: “Phone Number”,
“value”: null,
“placeholder”: “”,
“page”: “page1”
}, {
“name”: “Event Date”,
“type”: “date”,
“title”: “Event Date”,
“format”: “MM/dd/yyyy”,
“value”: null,
“placeholder”: “MM/DD/YYYY”,
“page”: “page1”
}, {
“name”: “Event Time”,
“type”: “text”,
“title”: “Event Time”,
“value”: null,
“placeholder”: “12:00 PM-3:00 PM”,
“page”: “page1”
}, {
“name”: “Event Description”,
“type”: “textarea”,
“title”: “Event Description”,
“value”: null,
“placeholder”: “Write a 4–5 sentence description of the purpose of the event, expected attendance, and a summary of the activities.”,
“page”: “page1”
}
]
}
The drag-and-drop form-building features are a bit more extensive. For example, they include formatting the form to display multiple fields in the same row. They can be explored by opening up forms to edit on the Organization workspace. We will also build the waiver form in this tutorial using drag-and-drop.
Building the Waiver Form
For the first time, we are about to build features from within the GUI of the workspace. The workspace GUI is important for airSlate’s document generation and flow automation. Go back to the workspace’s subdomain — here, https://blue-hills-park.airslate.com/.
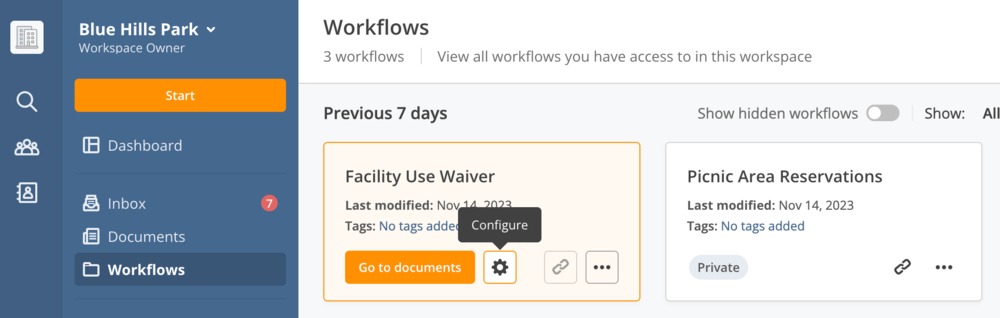
If you click on “Workflows” in the vertical menu on the left, which will take you to subdomain /templates, you should see the Templates you added. Click “Configure” on the “Facility Use Waiver” Template, as shown.
Once you go to the new page after “Configure,” click on “Add documents” and then on “Form or survey.” You will see a menu on the left with different types of form fields you can add. When you click on the fields on the menu, you add them to the end of the form. When you click on the fields on the form, you can modify them.
Add and modify form fields as follows:
- The heading is already on the form. Change its name to “Blue Hills Park Picnic Area Waiver Form.”
- Add a single line text field “Full Name.”
- Add an email field “Email.”
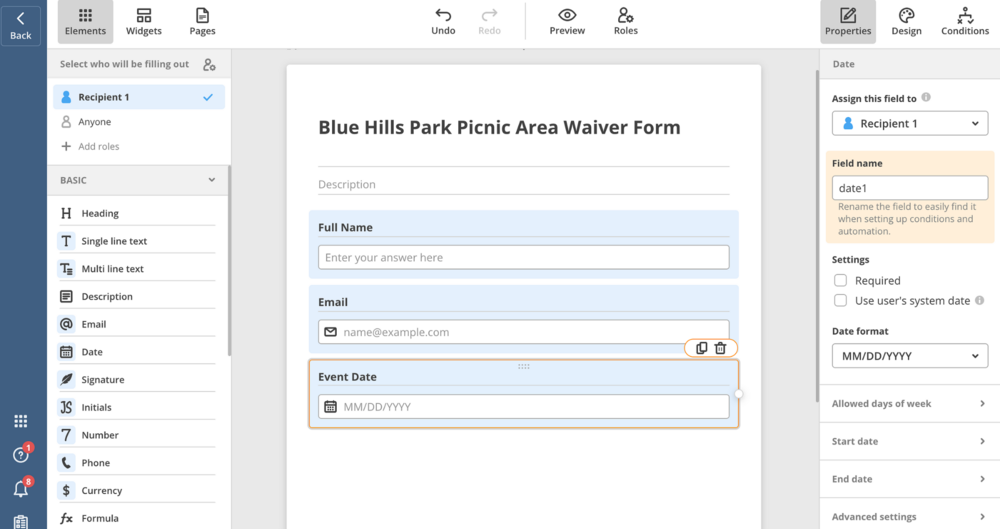
- Add a date field “Event Date.”
- Assign each of the fillable fields to “Recipient 1,” the person applying to use the facilities, on the menu on the top right. On the menu on the top left, make sure “Recipient 1” is also the person filling out the form.
The form should now look like this.
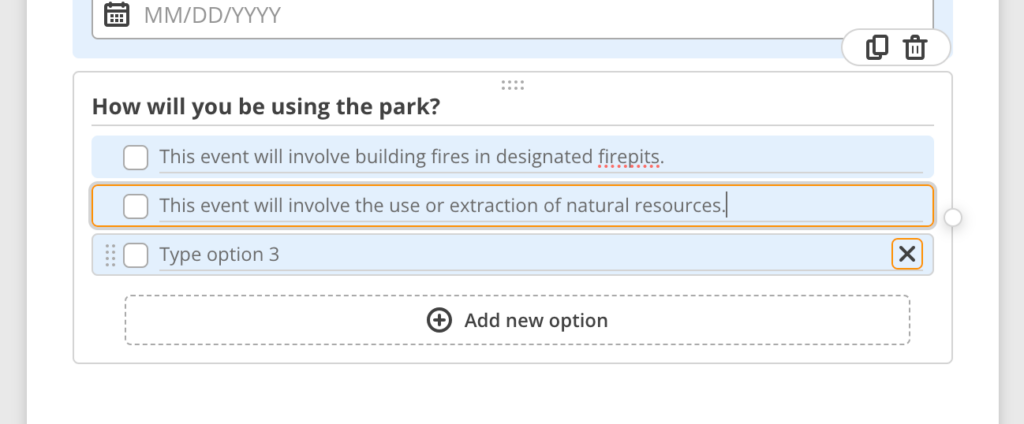
Next, we will add some more complicated fields, also set for Recipient 1 to fill out. Go down the form field menu on the left and add a “Checkbox.” The checkbox should be called “How will you be using the park?”
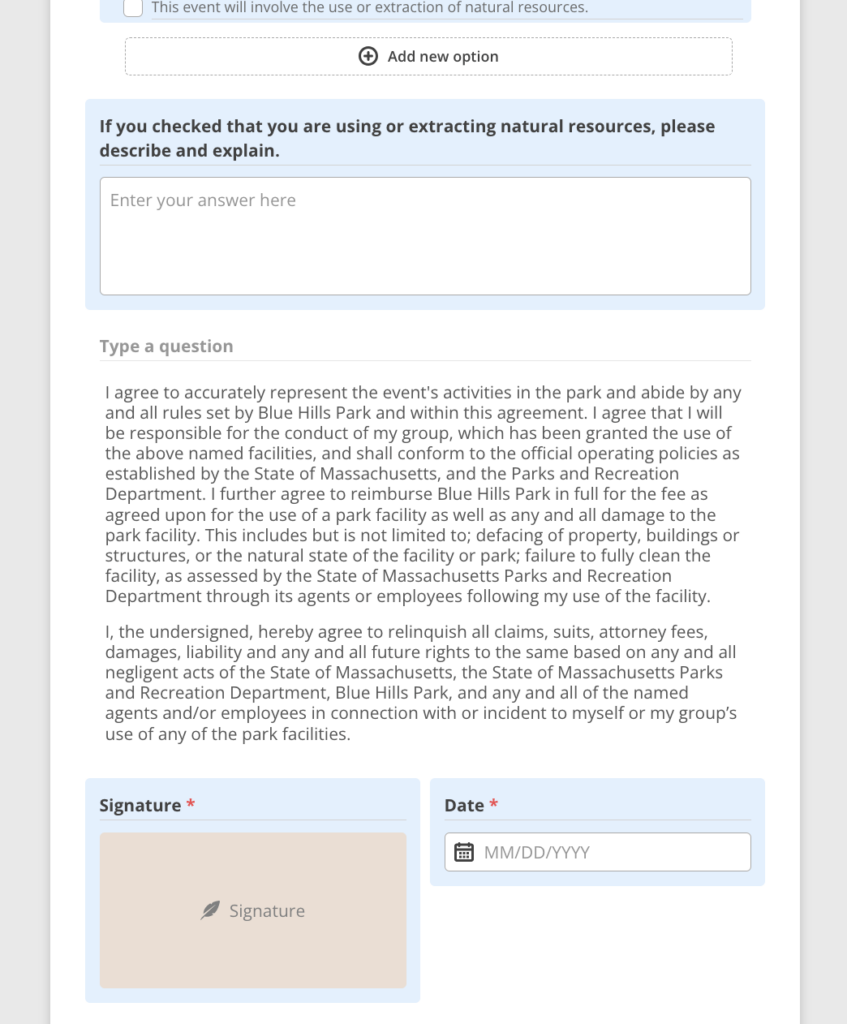
It should have two options: “This event will involve building fires in designated firepits.” and “This event will involve the use or extraction of natural resources.” Delete the third option by moving your mouse onto it and clicking the “X” that appears on its right. Just before you delete the third option, the checkbox should look like this.
- Next, go back up the form field menu on the left. Add a multi line text field “If you checked that you are using or extracting natural resources, please describe and explain.”
- Add a Description field. Delete “Type a question” and paste the following text in the text box below it:
I agree to accurately represent the event’s activities in the park and abide by any and all rules set by Blue Hills Park and within this agreement. I agree that I will be responsible for the conduct of my group, which has been granted the use of the above named facilities, and shall conform to the official operating policies as established by the State of Massachusetts, and the Parks and Recreation Department.
I further agree to reimburse Blue Hills Park in full for the fee as agreed upon for the use of a park facility as well as any and all damage to the park facility. This includes but is not limited to: defacing of property, buildings or structures, or the natural state of the facility or park; failure to fully clean the facility, as assessed by the State of Massachusetts Parks and Recreation Department through its agents or employees following my use of the facility.
I, the undersigned, hereby agree to relinquish all claims, suits, attorney fees, damages, liability and any and all future rights to the same based on any and all negligent acts of the State of Massachusetts, the State of Massachusetts Parks and Recreation Department, Blue Hills Park, and any and all of the named agents and/or employees in connection with or incident to myself or my group’s use of any of the park facilities.
- Add Signature and Date fields.
- Rescale the Date field to be the width of the Signature field, and on the same row as Signature. You can do this by clicking once on the Date field and moving your mouse on top of the small circle at the right of the Date field. Your cursor will change into two arrows pointing left and right. Press and hold your mouse, dragging it to the left until the Date field is narrow enough to be on the same line as the Signature field.
- Make the Signature and Date fields required fields. You can do this by clicking on each field, then clicking on the “Required” checkbox on the right menu. Making a field required will make a red star appear next to its name on the form.
Congratulations! You have added all the fields for the applicant. The remaining fields, after the checkbox, should look like this.
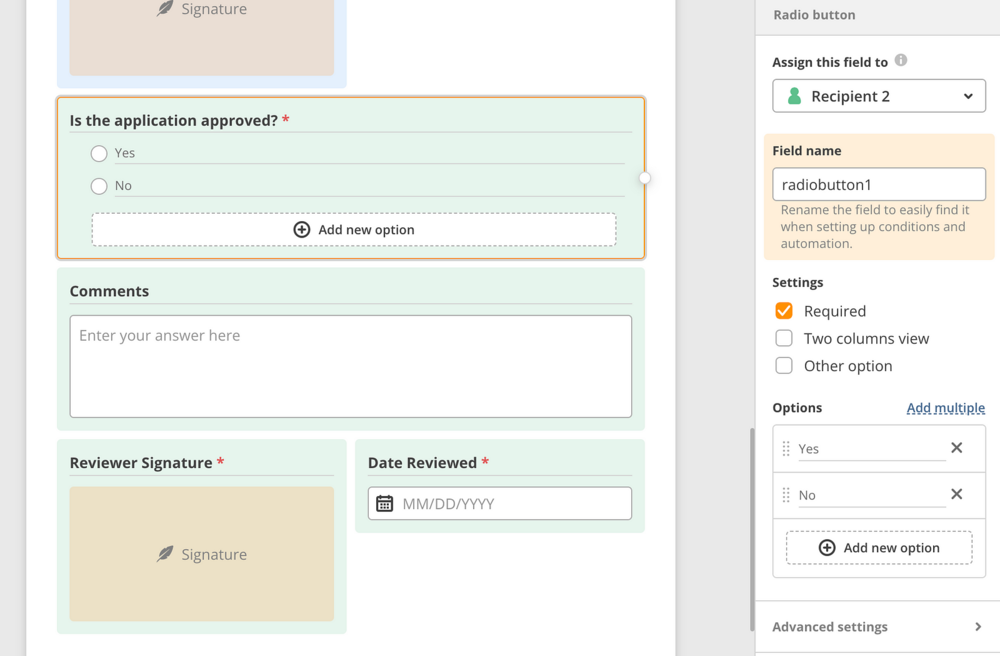
However, you are not done creating the form. The remaining part of the form is intended for the park official. The park official will fill out whether the application to book the picnic area has been approved.
Click on the “Assign this field to” dropdown at the top right, where you had assigned the fields to “Recipient 1.” Then click on “+ Add roles.” You will see a popup of the steps in your workflow.
In the popup, click on the “+” below the step with “Recipient 1” and above “Finish.” You will see another step for “Recipient 2” appear. Now click “Apply.”
Create Radio button, Multi line text, Signature, and Date fields as shown in the image below. The steps for creating and editing a Radio button field are similar to the steps for creating and editing a Checkbox field.
We are now finished with the form. Click “Continue” to close the form, and you will see a Workflow in the “Facility Use Waiver” Template.
Connecting the Workflow Steps
Now that we’ve added all the forms, it’s time to connect them and activate them appropriately. airSlate’s specialty is in automating these processes, and so its services have a number of document automation capabilities. This tutorial will illustrate a few of these capabilities.
Embedding the Booking Form on the webpage
The booking form is the first form the user fills out, at index.html. You can obtain the link to embed the form at “Create a link to a Template” here. Enter the IDs of your Organization and the initial booking Template.
In your response, you will receive two URLs. The urls link allows authorized airSlate users to view the form’s settings, although they can no longer edit them once the links have been generated. The urls_embedded link allows the form to be embedded on a public page, as we will do.
Save the urls_embedded link you receive. We will now enter the following HTML code into picnic_area/index.html on your local machine, replacing <Enter your urls_embedded link here> with the urls_embedded link:
<! — MVP.css quickstart template: https://github.com/andybrewer/mvp/ →
<!DOCTYPE html>
<html lang=”en”>
<head>
<link rel="icon" href="https://via.placeholder.com/1x1">
<meta charset="utf-8">
<meta name="description" content="Apply to book Blue Hills Park's picnic area">
<meta name="viewport" content="width=device-width, initial-scale=1.0">
<title>Picnic Area Reservations</title>
</head>
<body>
<iframe id="bookings" src="<Enter your urls_embedded link here>" style="position:absolute;width:95%;height:95%" />
</body>
</html>
Now, when you run the local server and load http://localhost:8000/, you should see the initial booking form filling most of the page.
Activating the Waiver Form
After the booking form is submitted with an email address, the waiver form is emailed to that address. It is later emailed to the park staff member when the applicant has finished their part.
These steps, however, have not been set up. We will do that now.
After you created the waiver form and clicked “Continue,” you should have gone to an editable Flow setup. It would look something like this. Click on “Add autostart” because we are setting the waiver form to get sent automatically.
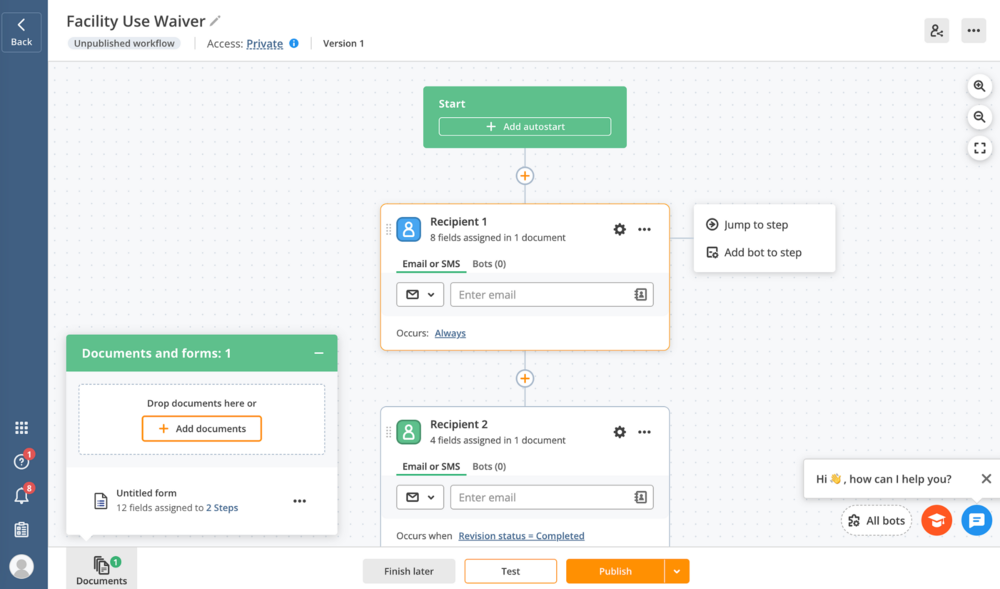
Click again on “Add autostart” on the popup that appears on the right, and select that you would like to start your Flow “From another Template” or “From another workflow.” Select “Picnic Area Reservations” as the source Template or workflow. Select the step on the “Select a Step” dropdown.
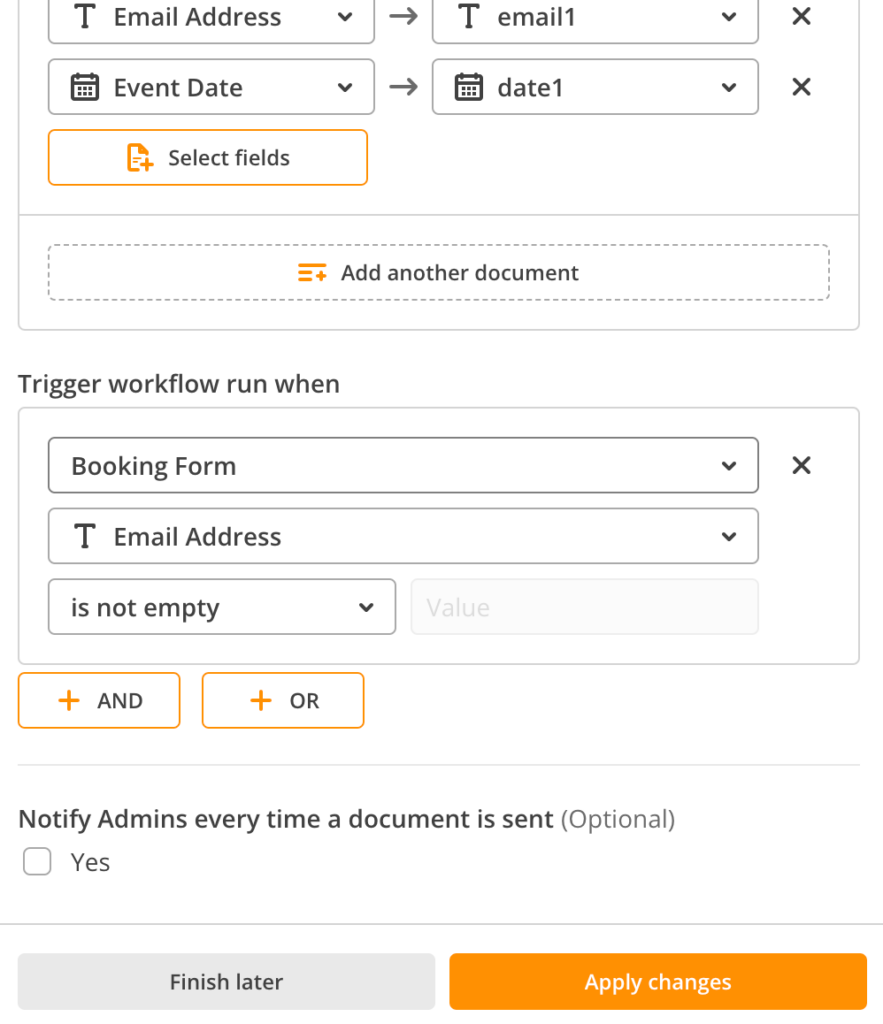
We will pre-fill some fields in this form with fields from the booking form. From the Booking Form source Workflow, select that you would like to import “Full Name,” “E-mail Address,” and “Event Date.” Select that these are mapped onto the “Untitled form” destination workflow, to the fields “singlelinetext1,” “email1,” and “date1,” respectively.
This is a lot, so I’ve given you a screenshot of what you should do. After you change these settings, scroll to the end of the list of settings on the popup that appears on the right because there are more you need to change.
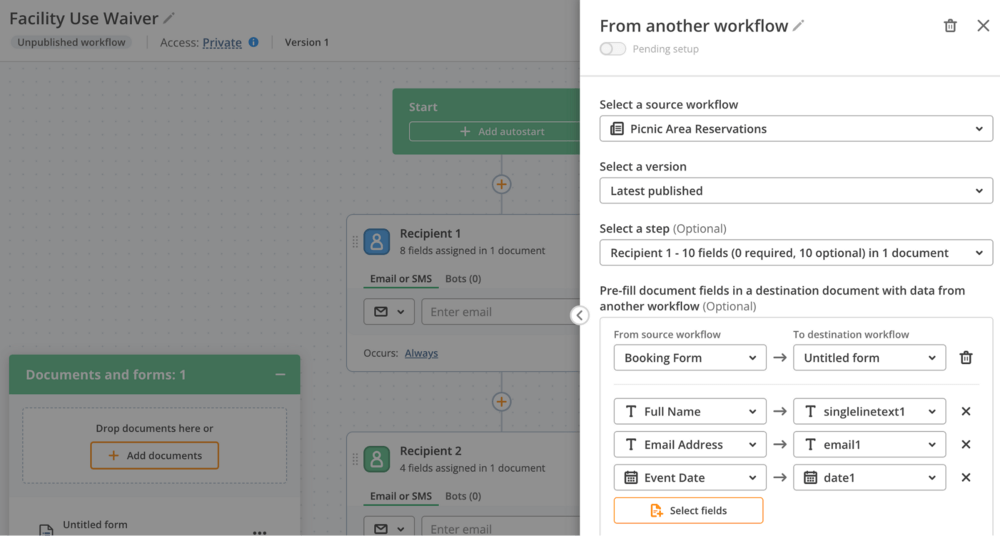
You must trigger the Flow start when the booking form’s email address is not empty. Enter that right below where you indicated the pre-filling of fields, as shown below. Then click on “Apply Changes.” Click “Apply” right after to close the popup.
Next, you will indicate that the form should be sent to the email address the user has filled in as theirs. Click in the text field for the email of Recipient 1 on the Flow, and a tab “+Data variable” will appear. Click on “+Data variable.”
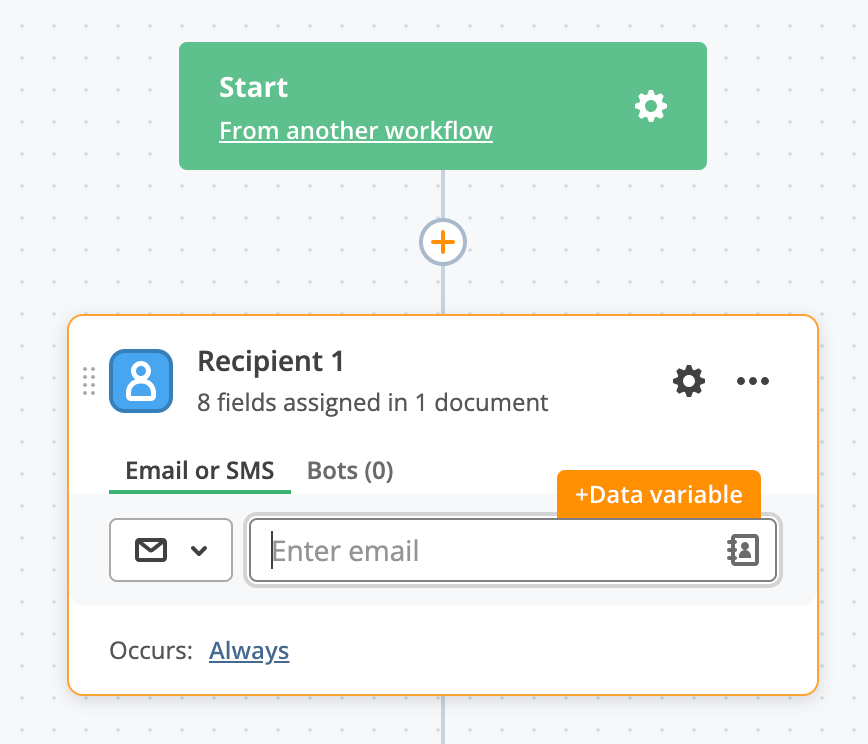
Select that the dynamic variable is from the document “Untitled form” and is “email1”.
When Recipient 1, the person applying to book the picnic area, is finished with their part of the form, the form needs to be sent to Recipient 2, the park official. Click in the text field for the email of Recipient 2 on the Flow, in the step after the one where you indicated Recipient 1’s email.
The tab “+Data variable” will pop up, as in the previous step, but do not click on it. Simply enter the park official’s email. You would probably want to use your own email as the proxy, so you receive the forms.
Customizing the messages
The last step is to customize the email messages the applicant and the park official receive when they are sent the forms to fill out. This can be done in the settings for each step – Recipient 1’s step and Recipient 2’s step in the workflow. The settings can be changed by clicking on the gear in the top right of the box showing the step.
Click the gear, and a menu will appear on the right. For both recipients, uncheck “Revoke access on documents completion” in that menu.
Then click to expand on “Recipient.” For Recipient 1, enter that they should receive an email with the subject “You’re invited to complete the Blue Hills Park Picnic Area reservation application”. Click “Apply.”
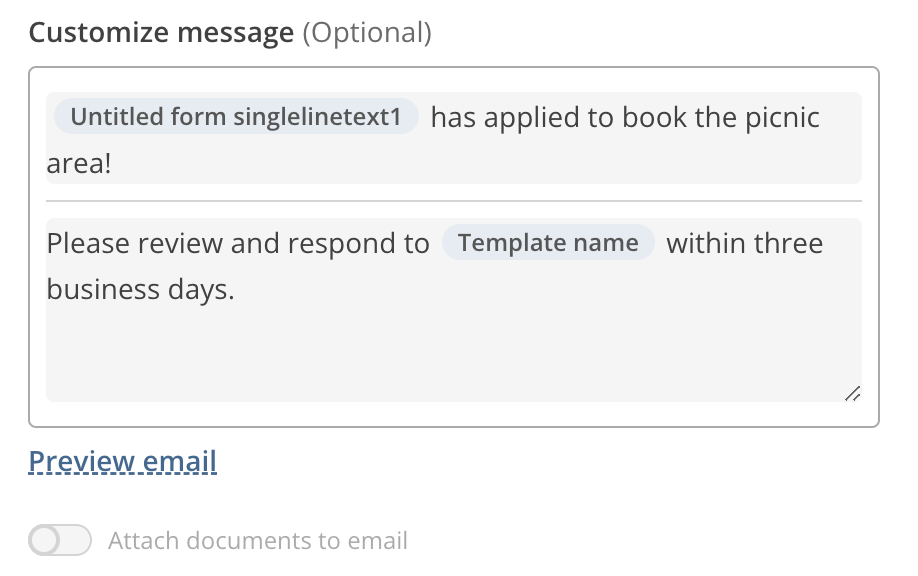
For Recipient 2, ensure that the “Recipient” expandable menu section says the email will be sent to the correct address. The subject and body should appear as shown below, using the “Data variable” tab to select the “singlelinetext1” (name) field of “Untitled form.”
Finally, on Recipient 2’s menu settings, you will expand on “Conditions” and make sure this step is set to run when the document data revision status is completed. Click “Apply.”
You might want to run these steps as a test to see whether they work. Finish the application by clicking on “Publish.”
Sweet?
Running the Program
The Blue Hills is a real park in the Boston area, Massachusetts, USA. Let’s imagine you are an instructor at a local university, applying to host a maple syruping party at its picnic area.
When you run the local server and go to its index.html page, you should see the initial booking form. Fill out and submit this form, indicating the email address where you would like to receive the waiver form.
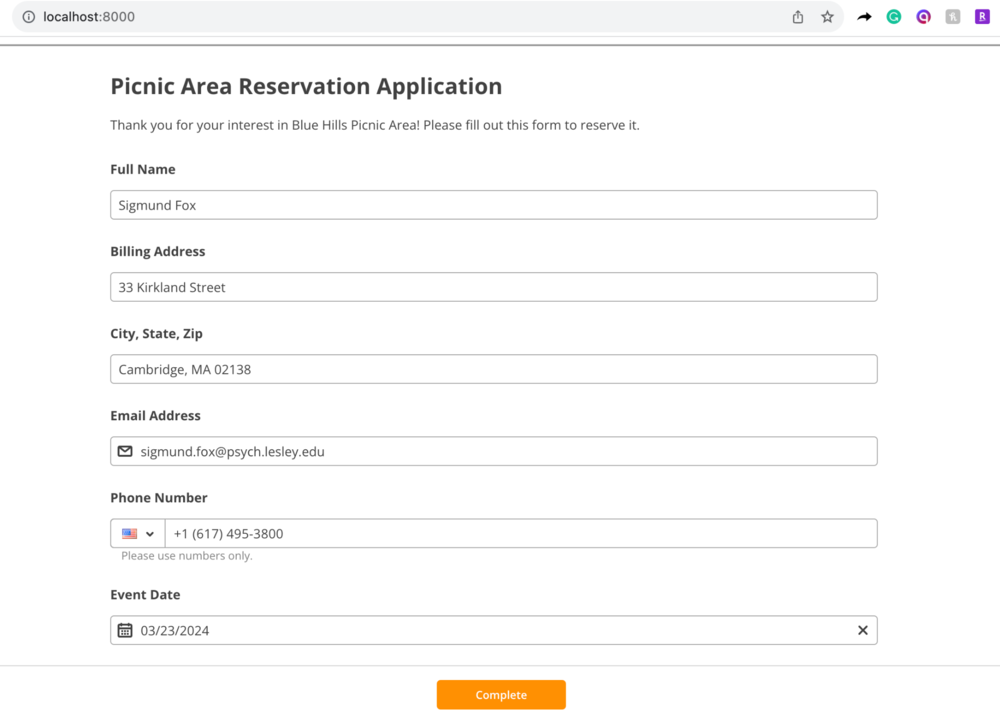
You will be redirected to the “welcome” page. You should also have promptly received an email inviting you to complete the waiver form.

The form in the email will be partly filled out with full name, email, and event date. Complete and sign the form.
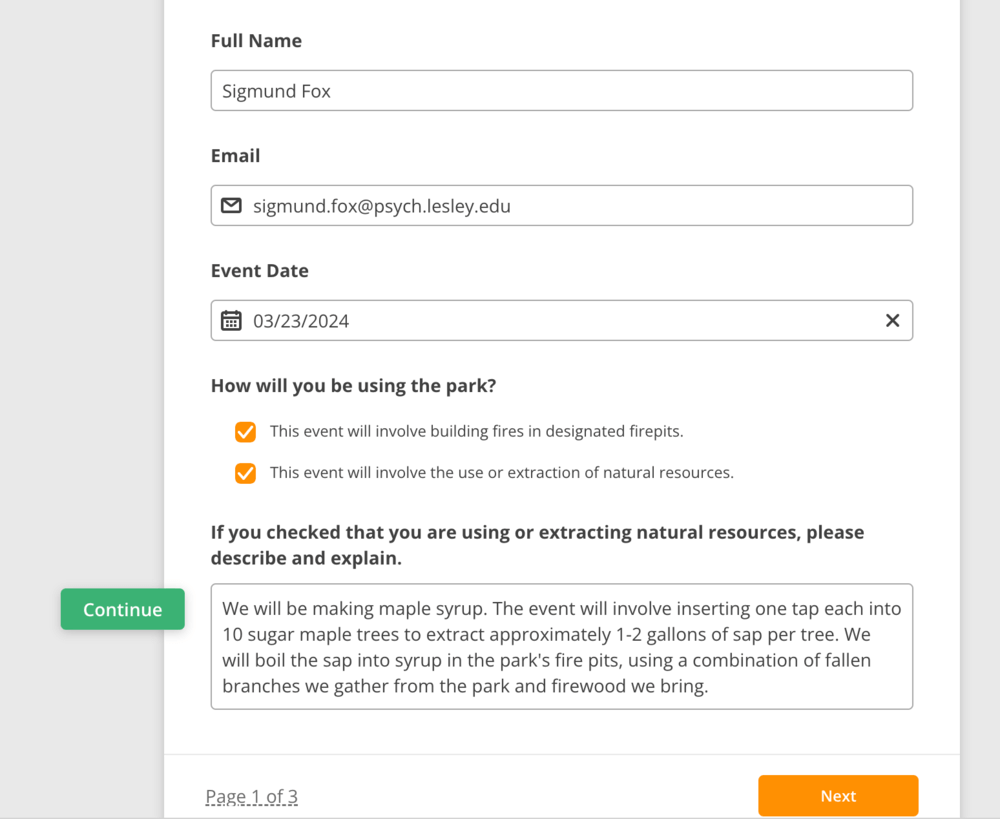
Once you have filled out and signed the form and clicked “Complete” on the bottom right, it will be sent to the park official. The subject of the email the park official receives should be “Sigmund Fox has applied to book the picnic area!” and its body should read “Please review and respond to Facility Use Waiver within three business days.”
Completed waiver forms, signed by both the applicant and the park official, can be downloaded from the Organization workspace. On the menu on the left, click “Workflows.” When the workflows appear, roll your mouse over “Facility Use Waiver” and click “Go to documents.” You will see the completed Flows.
For the Flow you want, click on “Download documents” to obtain a PDF copy of the waiver form, as well as a certificate that it has been signed by both parties.
If you’ve gotten to the end of this tutorial and built out the application, congratulations! Here is a picture of the Boston skyline taken from the Skyline Trail of the real Blue Hills.
These are only a few of the many document automation services provided by the API. To learn more, check out the rest of the Document Automation Hub API guide.