SMS API: Send forms over SMS text with airSlate’s Document Automation Hub API

airSlate is a no-code office workflow automation platform. Using its point-and-click interface, nontechnical office workers can quickly build elaborate processes for handling multi-step, standardized tasks. airSlate offers many services helpful to these workflows, such as PDF editing, eSignatures, and a library of over 85,000 state and industry-specific legal forms.
airSlate’s Document Automation Hub API allows developers to build, using code, a wide variety of functionalities for processing and sharing documents. If you have a workflow that involves a document and you want to use an API, consider using the Document Automation Hub API.
Using the Document Automation Hub API, you can build workflows that send forms in a variety of ways. This tutorial and this tutorial illustrate how you can embed a form on a mobile-friendly webpage, and also how you can send a form by email.
These tutorials explore multiple use cases of sending forms — a patient onboarding application and a park facility booking application. Hospitals and clinics are some of the most common real-world users of airSlate, and recreational facilities also use airSlate.

An even larger number of airSlate’s users are in the insurance industry, the focus of the tutorial in this article. In the workflow we will describe, users receive an SMS text message that they can fill out a form to obtain a life insurance quote. Sending forms by SMS text is another feature airSlate supports.
Sending forms by SMS messages
The workflow this article will illustrate is for sending SMS text messages to prospective customers of a life insurance company. It is as follows:
- The prospective customer is sent a promotional SMS text message, with a link to a form they can fill out to receive a life insurance quote.
- The prospective customer fills out the form.
- If the form is submitted with all required fields complete, the prospective customer receives a thank-you SMS text message with a link to the completed form.
You will need a device set up to receive SMS text messages, as well as a registered Document Automation Hub account. You will also need to have Python installed — this tutorial, in one section, uses Python 3 to run data parsing commands.
Authenticating with the API
It’s time to set up the API so you can make your first Document Automation Hub API requests. Go to the dashboard of your Document Automation Hub account and create a new application with the “Add Application” button on the top left, as shown below:
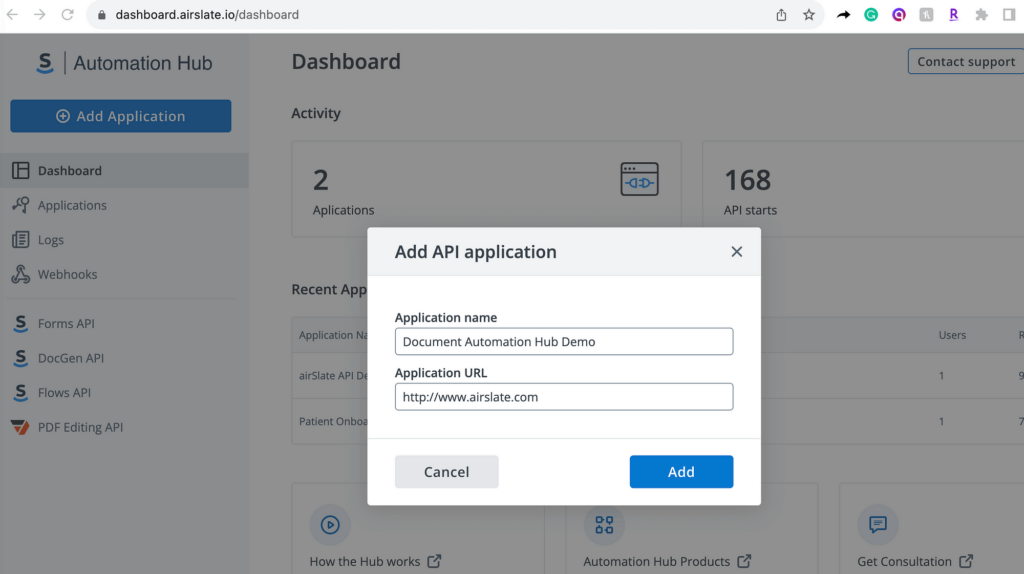
The application name is unimportant as long as you remember it. It should also be unique. Here, I’m naming it “Document Automation Hub Demo.” The application URL is even less important for this application, and I’m pointing it to the airSlate domain.
Once the application is created, click on its name where it appears on the Document Automation Hub account dashboard. You will get to a page that, going forward, this tutorial will call the application page. It shows the client ID; client secret; application URL; and “Code Grant,” “JWT Grant,” “Implicit Grant,” and “Password Grant” tabs.
The next step is to get an access token for an Implicit Grant, a special string enabling access to the API. An Implicit Grant is a type of authorization grant in which the access token is obtained directly, via a URL string. It is different from some other types of authorization grants, in which the authorization code obtained through the URL string would be exchanged for an access token as an extra verification step.
An Implicit Grant is chosen because the application handles individual users, with the information only moderately confidential. The form the prospective customer fills out is intended to be quick and user-friendly rather than comprehensive, personal, and precise.
The prospective customer enters information such as name, basic contact information, the type of life insurance plan they may be interested in, and a bit of self-reported physical and health information. The health information is a free-text description intended to be approximate rather than exact, that is not stored in an individual’s record.
To get an Implicit Grant access token, click on the “Implicit Grant” tab on the application page. At that tab, copy the “Link to get the access token” and enter it into the browser. Log into your account at the “Link to get the access token” URL and, once logged in, obtain the access token from the URL string. The access token is the entire part of the URL string between access_token= and &auth_outcome=logged-in. To test whether you have obtained a working access token, enter the access token into the “Token” field of “Auth” on this page. Specify that the API request is going to the “Main (production) server,” and click “Send API Request.” You should receive a “200 OK” response.
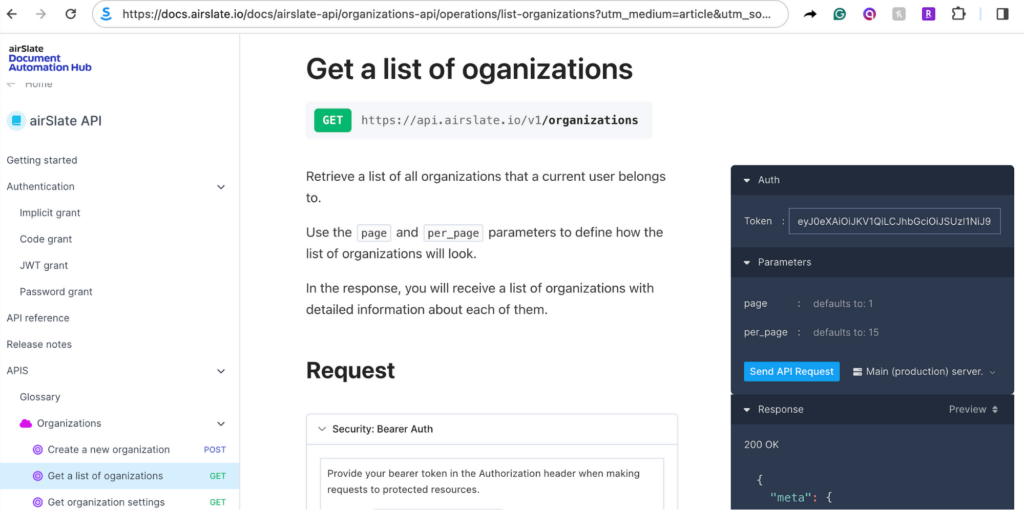
As we have just demonstrated, the Document Automation Hub API’s documentation has the unusual, highly convenient feature of enabling API requests to be made directly on the documentation pages. This can help developers use the API to set up workflows more efficiently.
Now that you have access to the API, it’s time to use the API to build the document automation capabilities.
Creating the Insurance Company’s Workspace
First, you will create the insurance company’s workspace as an organization that can store and run its own document workflow automation processes. Go to this “Create a new Organization” page, enter your access token in the “Token” field of “Auth,” specify that the API request is going to the production server, and enter the following in “Body”:
{
“name”: “Rabee Life Insurance”,
“subdomain”: “rabee-life-insurance”,
“category”: “INSURANCE”,
“size”: “0–5”
}
Once you finish forming your request, click “Send API Request.” If the response successfully creates the organization, save the organization ID, which you will use in future requests.
If the subdomain is taken, you will receive a 422 “Unprocessable Entity” error as a response and will need to enter another subdomain. Although the application built in this tutorial uses the subdomain “rabee-life-insurance,” it should not be a big deal to use another.
The Document Automation Hub API Guide’s pages for specific requests also include the code for making each request in various programming languages — cURL, HTTPie, WGet, Python3, the Requests library of Python, JavaScript, Node, Go, C, Objective-C, OCaml, C#, Java, HTTP/1.1, Clojure, Kotlin, PHP, Powershell, R, Ruby, and Swift. So, you can embed API calls into almost any existing piece of code.
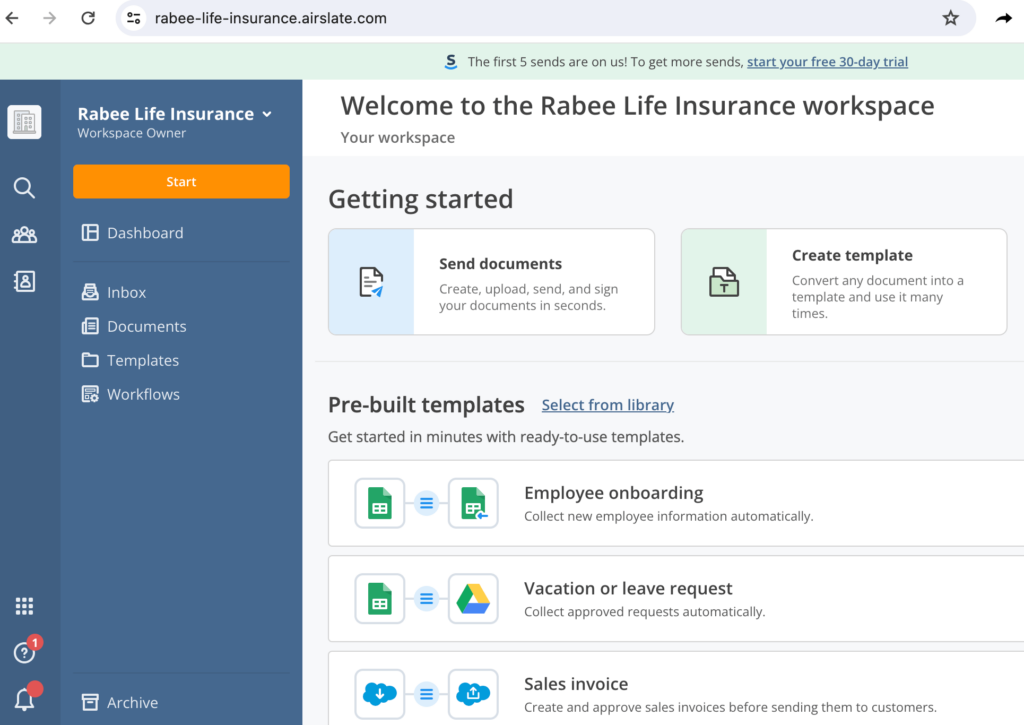
And now, if you go via browser to the subdomain you indicated in your request — for this tutorial, https://rabee-life-insurance.airslate.com/ — you will see an actual, empty workspace. Time to add some document automation.
Organizations, Templates, and Workflows
The workspace is described as the Organization in the API documentation. You can make many types of Document Automation Hub API requests to build automated document workflows within it. These automated processes are handled and run using special structures we can create within the Organization, called Templates and Workflows.
A Template is a group of fillable documents and forms that can be sent to recipients for completion. Templates require all their forms to be included when they are sent to a recipient. For this application, we are sending out one form for prospective customers to request a life insurance quote. As a result, we will only need one Template.
A Workflow, which used to be called a Flow, is a single run of the standard back-and-forth process for a Template’s documents and forms. For example, each time a person is hired, they might receive a different copy of the standard employment contract. A new Workflow might be created for each new hire, to send the contract to the new employee and their manager for signature.
We will create a single Workflow in our Template each time we send out the life insurance quote request form.
Creating the Template and uploading the Form
The next step is to create the Template for holding the life insurance quote request form. Go to “Create a new Template” in the documentation. Fill in your access token in “Token” and your organization ID in “organization_id.” Send the API request to the production server with the following body:
{
“name”: “Life Insurance Quote Request”
}
Upon receiving a successful response to your API request, make sure you save the template ID for future API calls. Or, you can get a list of Templates in your Organization here. With the Template created, we can now add the form to it.
The form comes from the Document Automation Hub API form library, which includes over 400 sample forms for a wide variety of purposes. You can get this full list of forms by making a request to “Get a list of form templates” here, filling in your access token and organization ID, and indicating that the response should return 500 results per page.
In case you were confused, the “Form templates” are not the same structure as the “Life Insurance Quote Request” Template we have just created. Going forward, we will call the “Form templates” forms when referring to their functionality and documents when referring to their structure.
We will use a Python script, either on the Python Shell or in a file, to make the API request to obtain the ID of the form you want to upload — the “Responsive Life-insurance Quote Form.” This script is based on the code available in the API documentation to make a “Get a list of form templates” request in Python 3.
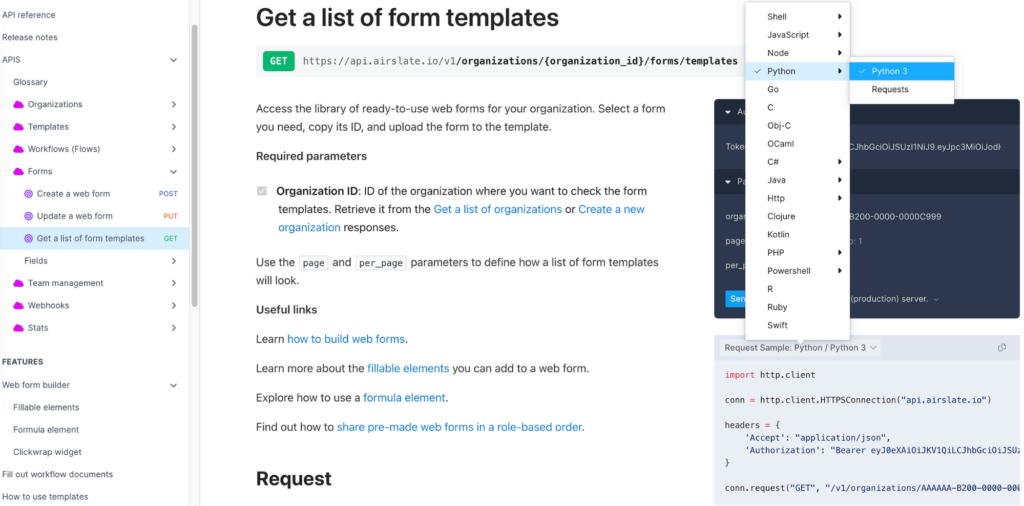
Here is the full Python script. Write your access token instead of <your access token> in variable ACCESS_TOKEN, and your Organization ID instead of <your organization ID> in variable ORGANIZATION_ID.
import http.client
import json

ACCESS_TOKEN = "<your access token>"
ORGANIZATION_ID = "<your organization ID>"

conn = http.client.HTTPSConnection("api.airslate.io")

headers = {
   'Accept': "application/json",
   'Authorization': "Bearer " + ACCESS_TOKEN
}

conn.request("GET", "/v1/organizations/{}/forms/templates?per_page=500".format(ORGANIZATION_ID), headers=headers)

res = conn.getresponse()
data = res.read()

json_string = data.decode("utf-8")
f = json.loads(json_string)
forms = f['data']

for form in forms:
   if (form['title'] == "Responsive Life-insurance Quote Form"):
       print(form['id'])
       break
The script prints out the ID of the “Responsive Life-insurance Quote Form.” Be sure to save this form ID for future API calls. You will use it for your next API call, uploading the form to the template.
To make this call, go to “Create a web form” in the documentation. Fill in your access token, the Organization ID, and the Template ID. Put the following request in “Body”:
{
“name”: “Responsive Life-insurance Quote Form”,
“form_template_id”: “<form ID>”
}
where <form ID> is the ID of the “Responsive Life-insurance Quote Form” you obtained in the previous script. Send the API request to the production server. Now the form should be uploaded to the Template.
Setting up the Form
Go to the Organization subdomain for your organization — for the organization created in this tutorial, http://rabee-life-insurance.airslate.com. You should now see, in the left menu bar under “Recents,” a “Life Insurance Quote Request.”
Click on this “Life Insurance Quote Request” in the left menu bar. Then click “Configure” at the top right of your screen. You should see, in the bottom left, that the “Responsive Life-insurance Quote Form” has been uploaded.
The screen should show an editable Workflow setup, where you can add and remove steps in processing the form. It should look something like this.
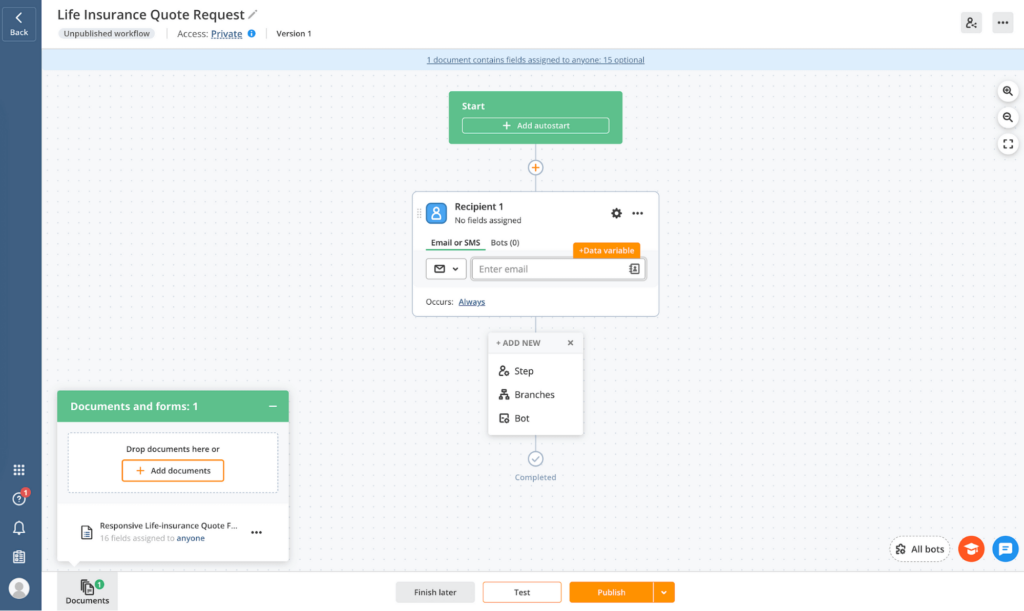
On this screen, you will hook up the Workflow so it actually sends text messages to recipients.
Making form fields required
At the bottom left of the screen, click on the three dots at the right of the “Responsive Life-Insurance Quote Form.” A menu will pop up, where you can select “Open document.” You will see the form, editable in the browser. Click on “Assign Fields” to Recipient 1 to close the popup.
Click on the field “Full Name.” A “Properties” menu will appear on the right. Select from that menu that the “Full Name” field is “Required.” You should now see a red star to the right of “Full Name,” above the text field.
Repeat by clicking on the following fields and selecting “Required,” to make the following fields required: “Street Address” (leave “Street Address Line 2” as optional), “City,” “State/Province,” “Zip Code,” “Country,” “Phone Number,” “E-mail,” “Birth Date,” “Which Life Plan?,” “How much life insurance do you want us to quote?,” “Height,” and “Weight.”
Leave “Street Address Line 2” and “Describe any health issues?” as optional. Click “Continue” at the bottom of the screen. The changes you have made to the form will be saved, and you will return to the editable Workflow setup.
Enabling Forms to be sent
We are setting the form to get sent automatically. To do so, click “Add autostart” near the top of the screen. Click again on “Add autostart” on the popup that appears on the right, and select that you would like a “Scheduled start.”
Set the time you want to receive the form. Here, I set it to 9:30 PM US Eastern time. Then, I selected that I wanted to repeat having it sent “Multiple times,” sending it every 24 hours and stopping sending after 7 occurrences. I also selected “Notify Admin every time a document is sent.” Click on “Apply changes” and then on “Apply.”
Next, you will indicate that the form should be sent to your number. On the step that says “Recipient 1,” select that you want to send the form by SMS by selecting “Phone,” and enter your number. Be sure the country flag shows the correct country.
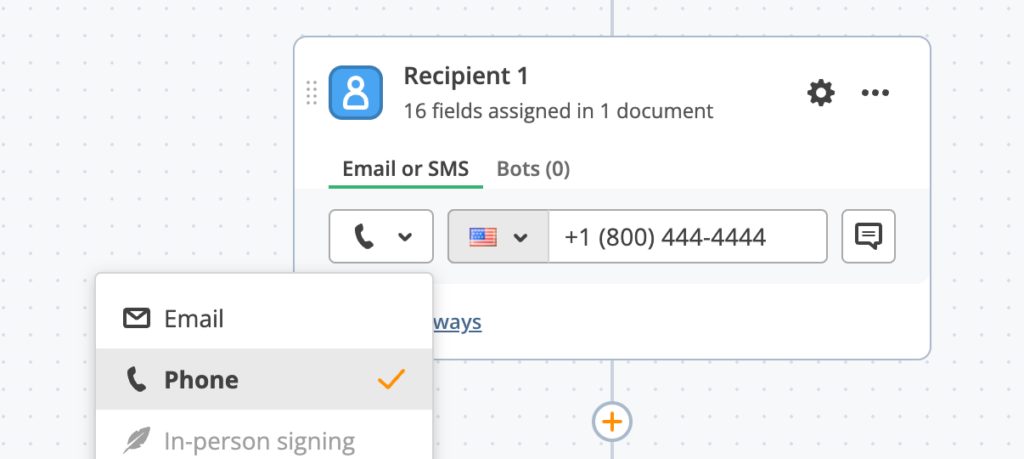
Then click the gear on the top right of the step with “Recipient 1,” and a menu will pop up on the right of the screen. Click “Recipient” on that menu. Enter the following “Happy Spring” message in “Customize Message,” before the link to your document. Then click “Apply.”
Happy Spring! Spring into Spring with Rabee Life Insurance. Fill out this form for a quote:
Next, click on the “+” below the step with “Recipient 1” and above “Completed.” Select that you want to add a new “Step.” You will see another step for “Recipient 2” appear. As you did for the step with “Recipient 1,” select that you want to send the form by SMS by selecting “Phone,” and enter your number. Note that “Recipient 2” is the same as “Recipient 1.”
Click on the gear on the step with “Recipient 2.” Click “Recipient” and enter the following “Thank you” message in “Customize message,” before the link to your document:
Thank you for requesting a quote from Rabee Life Insurance! A representative will get back to you. For your records:
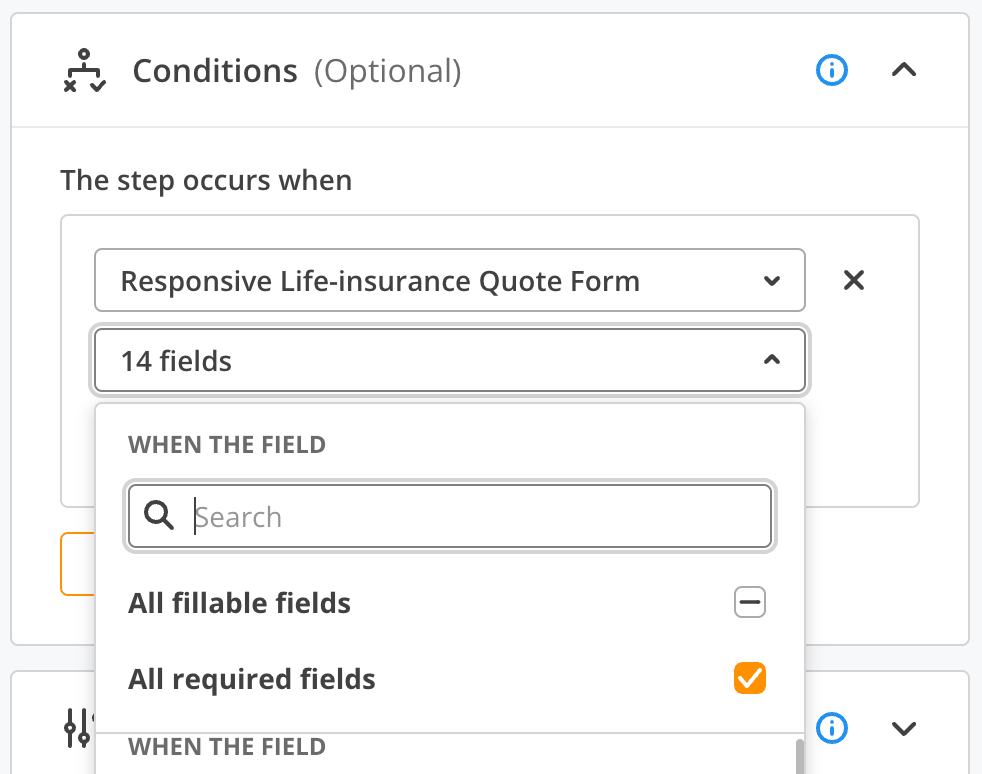
Click on “Conditions” on the right-side menu, which is below “Recipient.” You will see that the step occurs “When document data” “Revision status” “is completed.” Click “OR.”
For the new condition that appears, select that the step occurs when, for “Responsive Life-insurance Quote Form,” “All required fields” “is not empty.” In other words, the filled-out form is sent back to you with a thank you message once you have submitted it with all the required information.
Finally, click “Apply.” Congratulations, you have set up the workflow!
At the bottom of the editable Workflow setup, you can click on “Test” to send the form as a test to your email address, and “Publish” to finalize the Workflow.
Running the Workflow
In addition to the scheduled sending of the form, you can also run the workflow immediately upon request. When you click on “Responsive Life-insurance Quote Request” on the main page of your Organization, you will see a “Run Workflow” button. Click on it.
If you entered your phone number correctly, you should receive an SMS text message with the “Happy Spring” message you wrote, and a link to fill out the form. Upon filling out and submitting the form, you should receive an SMS text message with the “Thank You” message you wrote.
If you’ve gotten to the end of this tutorial and built out this application, congratulations! Enjoy this tulip garden and check out some other features in airSlate’s Document Automation Hub API.