Healthcare organizations increasingly utilize document automation to manage and send critical patient communications. Healthcare professionals recognize that healthcare communications are much faster and cheaper when done electronically, using paperless document automation services that can track each step of a standard process.
Healthcare document management software streamlines and automates your patient communication workflow, making it easier and more efficient. The patient onboarding process, for example, is essential for taking patients into a healthcare facility and giving them a positive impression. A clunky patient onboarding process can be quite frustrating. However, a smooth and user-friendly digital onboarding process benefits both the patient and the provider.
With digital onboarding, the patient can fill out the form from home, on their own time, looking up required information as needed. They can receive immediate feedback on whether the information is complete and properly formatted. If the provider already has the information, they can help the patient by pre-populating form fields.
To stay competitive, it is becoming increasingly necessary for healthcare professionals to adopt a digital document process. This tutorial will show you how to build basic document workflow automation software and help you understand the importance of document automation in healthcare.
Here, we will build a simplified demo patient onboarding application for Byrd Metropolitan Medical Group, a fictional medical group. We will use airSlate’s Document Automation Hub APIs. airSlate is regularly recognized as a provider of some of the best document automation software.
The Document Automation Hub APIs support various document automation needs, such as dynamically generating documents, enabling conditional workflows, sending forms to multiple recipients, collecting secure eSignatures, and editing PDFs.The full list of functionalities is quite extensive and is in the Document Automation Hub user guide. A few of these document automation tools will be illustrated in this article.
The patient onboarding application
The patient onboarding workflow of this application is as follows:
- Users schedule appointments at Byrd Metropolitan Medical Group through a PDF form on an open HTML page.
- When an appointment scheduling form is submitted, the patient is emailed another form to fill out, where they can provide more medical information.
The application will run on your local machine using Python’s SimpleHTTPServer. To use SimpleHTTPServer, you will need to have Python installed — this tutorial uses Python 3. To use the Document Automation Hub APIs, you will also need a registered Document Automation Hub account.
In the directory of your choice on your local machine, create a folder called patient_onboarding containing two files: index.html and welcome.html. We’re leaving the file index.html blank for now. Later, we will embed the first forms in our document automation process into that page. Submission of that form will redirect you to welcome.html. Put the following code in welcome.html. It’s based on Andy Brewer’s MVP template, and you could probably copy and paste it. Here’s the code:
<!-- MVP.css quickstart template: https://github.com/andybrewer/mvp/ -->

<!DOCTYPE html>
<html lang="en">

<head>
   <link rel="icon" href="https://via.placeholder.com/1x1">
   <link rel="stylesheet" href="https://unpkg.com/mvp.css">

   <meta charset="utf-8">
   <meta name="description" content="Welcome page for Byrd Metropolitan Medical Group">
   <meta name="viewport" content="width=device-width, initial-scale=1.0">

   <title>Welcome! - Byrd Metropolitan Medical Group</title>
</head>

<body>
   <header>
       <h1>Welcome to Byrd Metropolitan Medical Group, and thank you for booking an appointment with us!</h1>
       <p>Check your email for next steps.</p>
   </header>
   <main>
           <!-- Image source: Ashashyou, CC BY-SA 4.0 https://creativecommons.org/licenses/by-sa/4.0, via Wikimedia Commons -->
           <img alt="Thank-you-word-cloud" src="https://upload.wikimedia.org/wikipedia/commons/2/25/Thank-you-word-cloud.jpg" style="display: block;margin-left: auto;margin-right: auto;width: 80%;" />
   </main>
   <footer>
       <hr />
       <p>
           <small>
               Questions? Contact airSlate at <a href="https://www.airslate.com/contact?utm_medium=article&utm_source=blog&utm_campaign=document_automation_hub_api&utm_content=9_2023-Building_an_Automated_Patient_Onboarding_App_With_APIs&utm_term=welcome_page">this link</a>.
           </small>
       </p>
   </footer>
</body>

</html>
In the main patient_onboarding directory, run the local server on the command line. My local machine is a Mac, and my command is as follows:
$ python3 -m http.server
Once the server starts, navigate in your browser to http://localhost:8000/welcome.html.
Now you have some nice pages to embed your forms in and redirect the user to on completion, so we will switch to building the actual document automation processes.
Authenticating with the API
It’s time to set up the API so you can make your first Document Automation Hub API requests. Go to the dashboard of your Document Automation Hub account and create a new application with the “Add Application” button on the top left, as shown below:
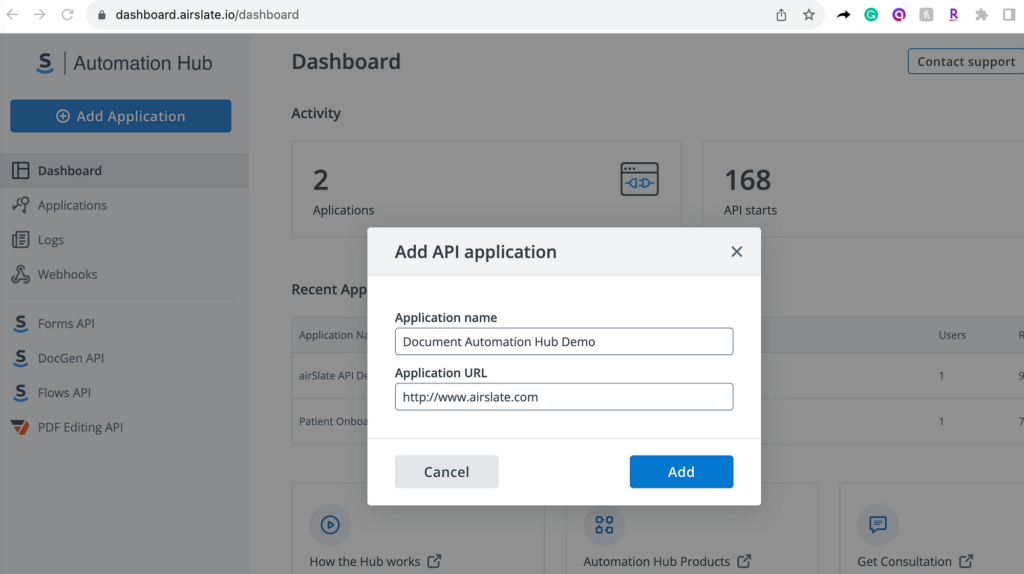
The application name is unimportant as long as you remember it. It should also be unique. Here, I’m naming it “Document Automation Hub Demo.” The application URL is even less important for this application, and I’m pointing it to the airSlate domain.
Once the application is created, click on its name where it appears on the Document Automation Hub account dashboard. You will get to a page that, going forward, this tutorial will call the application page. It shows the client ID, client secret, application URL, and “Code Grant,” “JWT Grant,” and “Implicit Grant” tabs. The next step is to get an authorization code for a Code Grant. A Code Grant is a type of authorization grant that requires the user to agree for you to access user data. Because of its extra security, it is the most suitable authorization grant for sensitive patient data. You can read the full documentation for how to get this authorization here or watch this video.
You need to use the authorization code to get the bearer token, valid for two days. The request for the bearer token can be copied from the application page. In the request, you must enter the redirect URI, client ID, client secret, and authorization code. Since the first three are copied automatically, the authorization code is the only part you must copy manually.
When you have successfully obtained the bearer token, copy and save the string called access_token which you receive in your response. The access token will enable you to authenticate your Document Automation Hub API requests.
{“error”:”invalid_request”,”error_description”:”The request is missing a required parameter, includes an invalid parameter value, includes a parameter more than once, or is otherwise malformed.”,”hint”:”Cannot decrypt the authorization code”,”message”:”The request is missing a required parameter, includes an invalid parameter value, includes a parameter more than once, or is otherwise malformed.”}
This error is a known bug. You can avoid it by entering the username and password manually. If you cannot, you should contact airSlate Customer Support, describing the issue, to get proper access.
Creating Byrd Metropolitan Medical Group’s workspace
Now that you can authenticate, it’s time to build the document automation capabilities using the Document Automation Hub API. First, you will create Byrd Metropolitan Medical Group’s workspace as an organization that can store and run its own document workflow automation processes.
For one-off requests, the most convenient way to use the Document Automation Hub API is by running it on the production server, on the page of the documentation itself. To create Byrd Metropolitan Medical Group, go to this “Create a new Organization” page, enter your access_token in the “Token” field of “Auth,” specify that the API request is going to the production server, and enter the following in “Body”:
{
“name”: “Byrd Metropolitan Medical Group”,
“subdomain”: “byrd-metropolitan-medical”,
“category”: “HEALTH_CARE”,
“size”: “0–5”
}
On the API documentation page, the request will look like this:
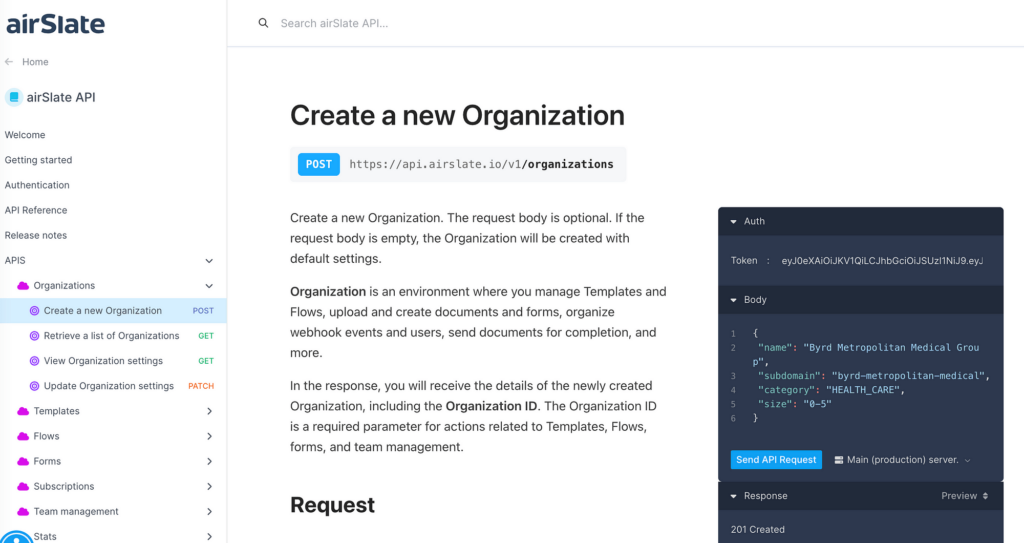
Once you finish forming your request, click “Send API Request.” If the response successfully creates the organization, save the organization ID, which you will use in future requests.
If the subdomain is taken, you will receive a 422 “Unprocessable Entity” error as a response and will need to enter another subdomain. Although the application built in this tutorial uses the subdomain “byrd-metropolitan-medical,” it should not be a big deal to use another.
The Document Automation Hub API Guide’s pages for specific requests also include the code for making each request in various programming languages. Here is the cURL command for creating Byrd Metropolitan Medical Group’s workspace, for example:
https://gist.github.com/La-comadreja/4cd0ed87c9fba061a1d7bebef5252541#file-byrd_metropolitan_medical_group_curl
Here is the Python3 code to do the same:
https://gist.github.com/La-comadreja/d4fb61b1a63a1786534695b0cae69214#file-byrd_metropolitan_medical_group_python
On the page for each of the API commands, the code for running that command is also available in HTTPie, WGet, the Requests library of Python, JavaScript, Node, Go, C, Objective-C, OCaml, C#, Java, HTTP/1.1, Clojure, Kotlin, PHP, Powershell, R, Ruby, and Swift. So, you can embed API calls into almost any existing piece of code.
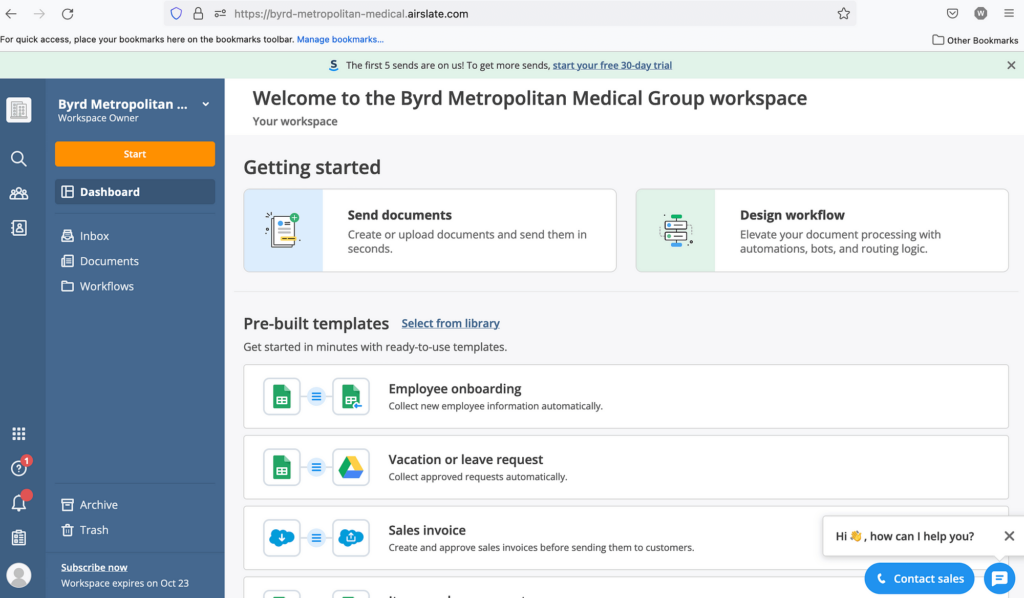
And now, if you go via browser to the subdomain you indicated in your request — for this tutorial, https://byrd-metropolitan-medical.airslate.com/ — you will see an actual, empty workspace. Time to add some document automation.
Organizations, Templates, and Flows
The workspace is described as the Organization in the airSlate API documentation. To enable it to have document flow automation, you need to make additional Document Automation Hub API requests to create structures within the workspace, which are called Templates and Flows.
A Template is a group of fillable documents and forms that can be sent to recipients for completion. Since Templates require all their forms to be included when they are sent to a recipient, we will create two Templates, one containing the appointment scheduling form and the other containing the new patient enrollment form. The new patient enrollment form is only sent after submitting the appointment scheduling form.
A Flow is a single run of the standard back-and-forth process for a Template’s documents and forms. For example, each time a person is hired, they might receive a different copy of the standard employment contract. A new Flow might be created for each new hire to send the contract to the new employee and their manager for signature.
We will create a single Flow in the appointment scheduling Template for all users to fill out the form. We will create a new Flow in the new patient enrollment Template for each time the new patient enrollment form is sent out.
Creating the Templates
The next step is to create the two Templates for holding the Documents. Go to “Create a new Template” in the documentation. Fill in your access_token in “Token” and your organization ID in “organization_id.” For the appointment scheduling Template, send the API request to the production server with the following body:
{
“name”: “Schedule Appointment”,
“description”: “Template for scheduling medical appointments”,
“redirect_url”: “http://localhost:8000/welcome.html"
}
Make sure the redirect_url is set to the “welcome” page of the local server you created, where the user will be redirected when the appointment scheduling form is submitted.
For the new patient enrollment Template, send the API request to the production server with the following body:
{
“name”: “New Patient Enrollment”,
“description”: “Template for the new patient enrollment form”,
“redirect_url”: “http://www.airslate.com"
}
Make sure you save both Template IDs for future API calls. Or, you can get a list of Templates in your Organization here.
airSlate’s Voluminous Libraries of Forms
Now it is time to add the forms. The Document Automation Hub API includes a library of over 400 forms for various uses. You can get this full list of forms by making a request to “Get a list of form templates” here, indicating that the response should return 500 results per page. You might want to use cURL to make the request on the terminal so that you can see all the results more easily.
Invoking “Get a list of form templates” generates IDs and other ways to access the forms, which expire in a few hours. You should see the information for the “Online Doctor Appointment Form” and “New Patient Enrollment Form,” two of the simpler forms in the library and the ones we will be using, along with the rest.
In case you were confused, the “Form templates” are not the same structure as the “Schedule Appointment” and “New Patient Enrollment” Templates we have just created. Going forward, we will call the “Form templates” forms when referring to their functionality and documents when referring to their structure. preview_file_url is a PNG preview of the form’s first part and is irrelevant to this tutorial.The forms retrievable from the API are just a few of the tens of thousands of pre-made forms available to airSlate users. airSlate workspaces include US Legal Forms, a complimentary library of over 85,000 legally binding contracts and forms for various purposes. In addition, it is possible to build forms from scratch.
Adding the Forms
When you go to your Organization’s dashboard — here, https://byrd-metropolitan-medical.airslate.com/ — you should now see that it has two Templates called “Schedule Appointment” and “New Patient Enrollment.” For each Template, click on “Configure.”
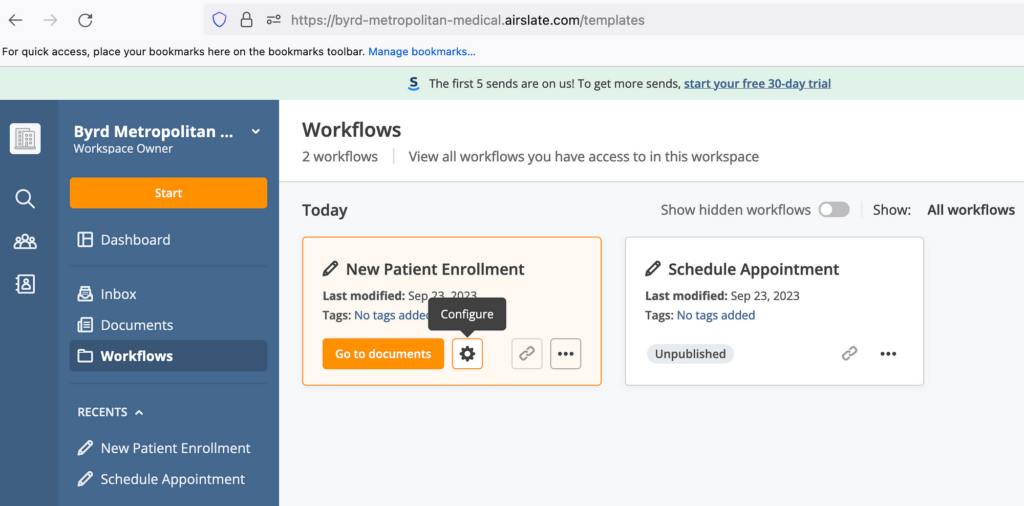
Once you go to the new page after “Configure,” click on “Add Documents” and then on “Library.” Search for the relevant forms by name in the Library — find the “Online Doctor Appointment Form” for the Schedule Appointment Template and the “New Patient Enrollment Form” for the New Patient Enrollment Template.
When you find the relevant form in the library, click on “Use Form” and watch the form load in a window. For the Online Doctor Appointment Form, select “Anyone” when prompted with “Assign Fields.” For the New Patient Enrollment Form, you can keep that the fields are assigned to “Role 1.”
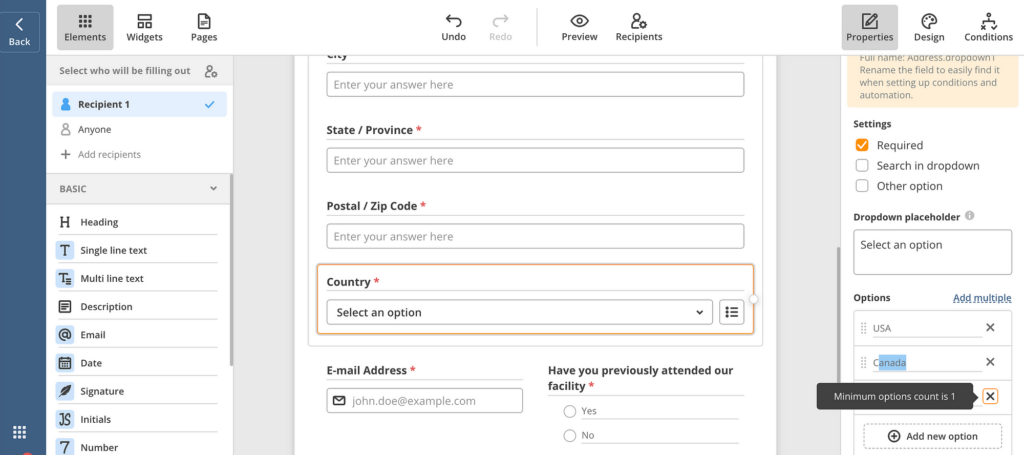
To edit the form fields, click on them and you will see settings pop up on the right. We are editing the Online Doctor Appointment Form’s “Country” field. Click on that field and scroll down on the settings until you see Options. Enter “USA” and “Canada” as options, and click on “X” to remove the third option.
When you are done editing the form, click “Continue” at the bottom of the window. The form will be added to the Template. You should see an editable Flow setup, which we will revisit later.
Publishing the Online Doctor Appointment Form
The next step is to embed the online doctor appointment form into your application’s index.html. You can obtain the link to embed the form at “Generate a shareable link to a Template” here. Enter the IDs of your organization and the Schedule Appointment Template.
In your response, you will receive two URLs. The urls link allows authorized airSlate users to view the form’s settings, although they can no longer edit them once the links have been generated. The urls_embedded link allows the form to be embedded on a public page, as we will do.
Save the urls_embedded link you receive. We will now enter the following HTML code into patient_onboarding/index.html on your local machine, replacing <Enter your urls_embedded link here> with the urls_embedded link:
<! - MVP.css quickstart template: https://github.com/andybrewer/mvp/ →
<!DOCTYPE html>
<html lang=”en”>
<head>
<link rel="icon" href="https://via.placeholder.com/1x1">
<meta charset="utf-8">
<meta name="description" content="Appointment scheduling for Byrd Metropolitan Medical Group">
<meta name="viewport" content="width=device-width, initial-scale=1.0">
<title>Home - Byrd Metropolitan Medical Group</title>
</head>
<body>
<iframe id="appointments" src="<Enter your urls_embedded link here>" style="position:absolute;width:95%;height:95%" />
</body>
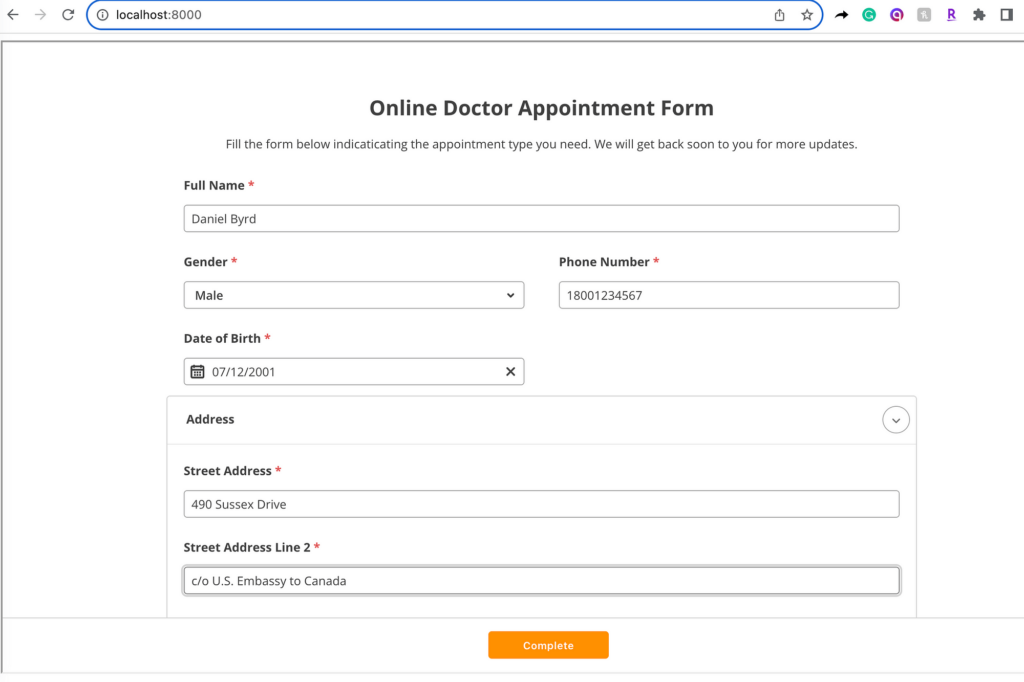
</html>Now, when you run the local server and load http://localhost:8000/, you should see the Online Doctor Appointment Form filling most of the page.
Setting Up the New Patient Enrollment Form
The last step is to modify the New Patient Enrollment Template’s Flow settings, including setting the New Patient Enrollment Form to be emailed to the user on submission of the Online Doctor Appointment Form.
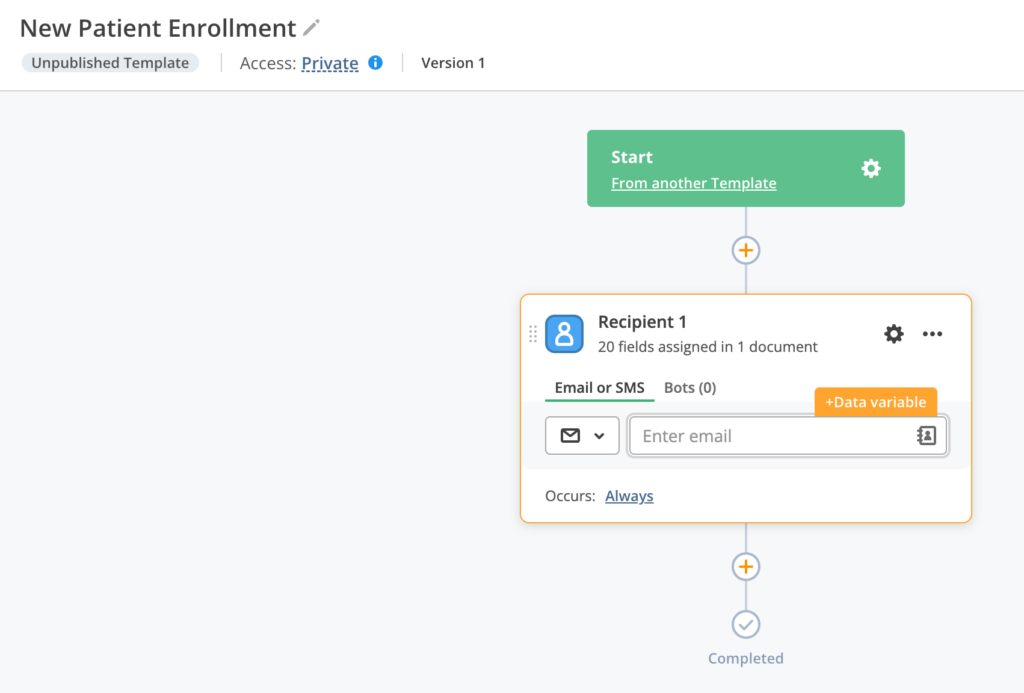
After you have loaded the New Patient Enrollment Form and clicked “Continue,” you should see an editable Flow setup, as mentioned earlier. It would look something like this. Click on “Add autostart” because we are setting the New Patient Enrollment Form to get sent automatically.
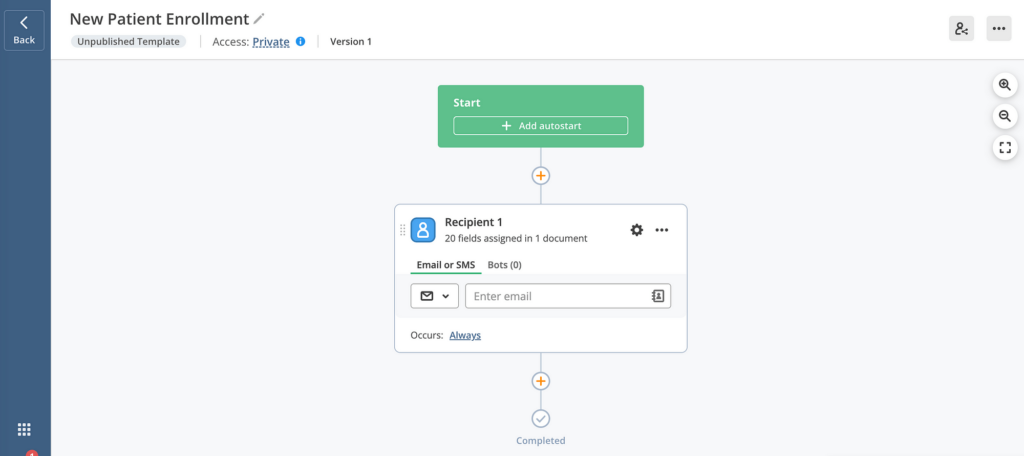
Click again on “Add autostart” on the popup that appears on the right, and select that you would like to start your Flow “From another Template” or “From another workflow.” Select “Schedule Appointment” as the source Template or workflow. Select the step on the “Select a Step” dropdown.
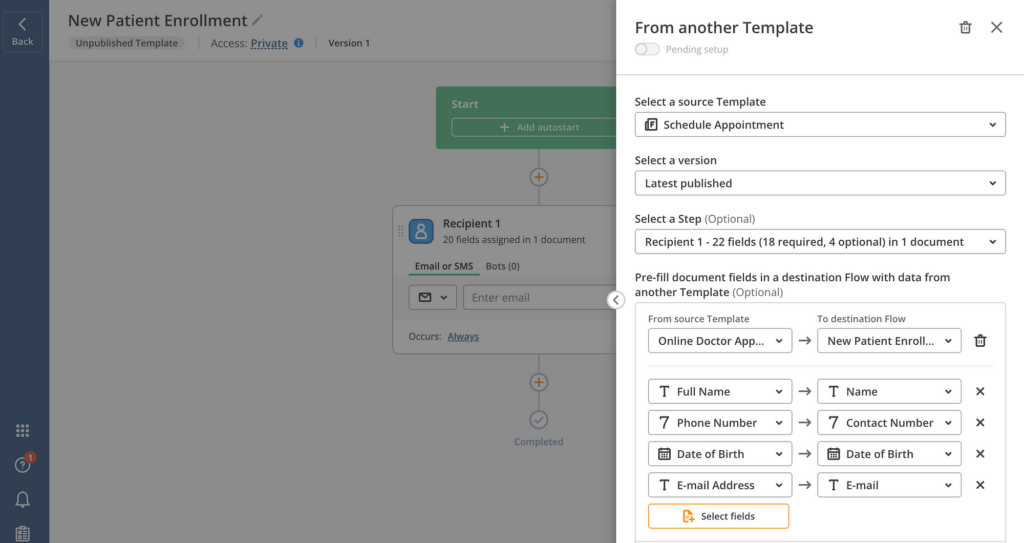
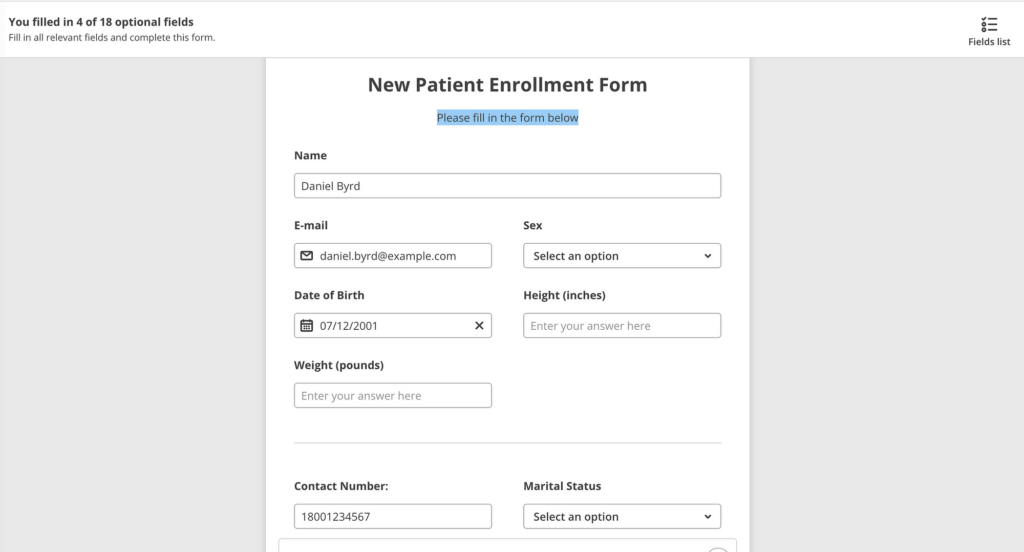
We will pre-fill some fields in this form with fields from the appointment scheduling form. From the Online Doctor Appointment source Template, select that you would like to import “Full Name,” “Phone Number,” “Date of Birth,” and “E-mail Address.” Select that these are mapped onto the New Patient Enrollment Form to the fields “Name,” “Contact Number,” “Date of Birth,” and “E-mail,” respectively.
This is a lot, so I’ve given you a screenshot of what you should do. After you change these settings, scroll to the end of the list of settings on the popup that appears on the right because there are more you need to change.
You must trigger the Flow start when the Online Doctor Appointment Form’s E-mail Address is not empty. Enter that right below where you indicated the pre-filling of fields, as shown below. Then click on “Apply Changes.” Click “Apply” right after to close the popup.
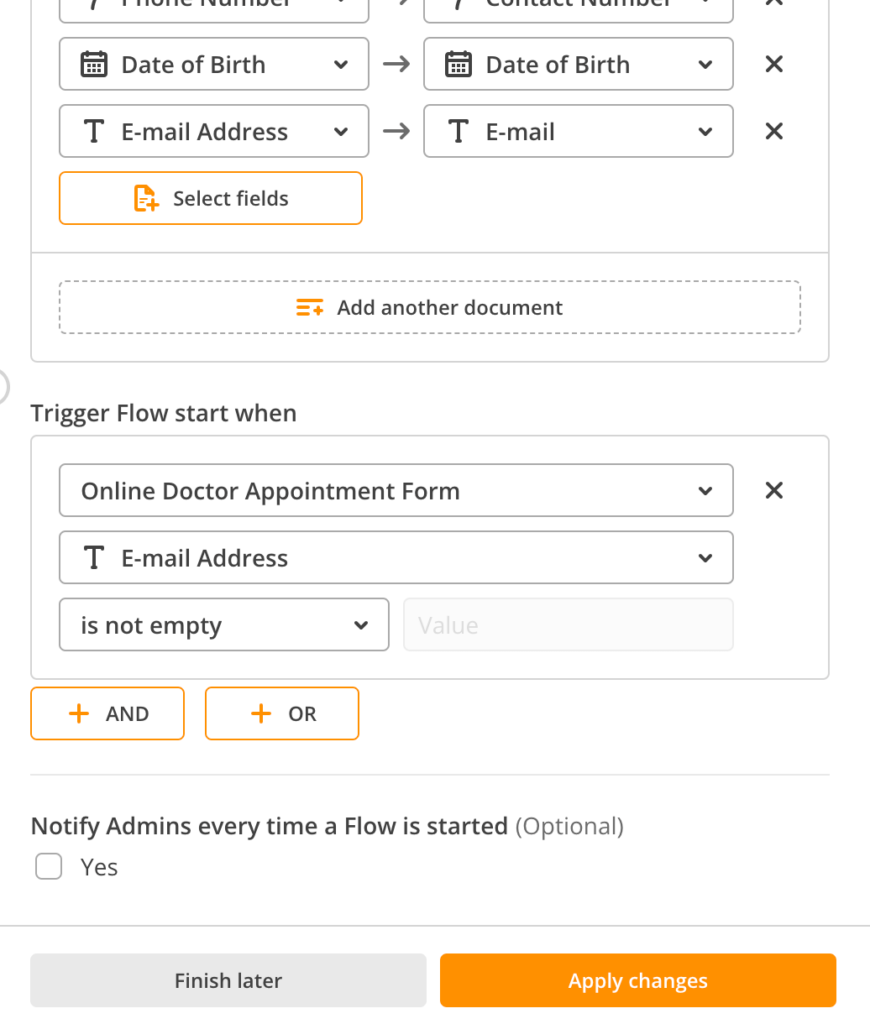
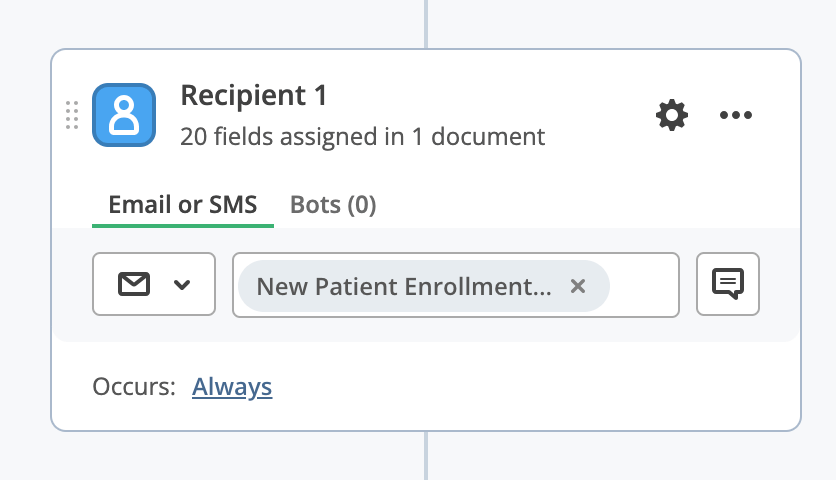
Lastly, you will indicate that the form should be sent to the e-mail address the user has filled in as theirs. Click in the text field for the e-mail of Recipient 1 on the Flow, and a tab “+Data variable” will appear. Click on “+Data variable.”
Select that the dynamic variable is from the document “New Patient Enrollment Form” and is E-mail.
You might want to run these steps as a test to see whether they work. Finish the application by clicking on “Publish”.
Running the Program
When you run the local server and go to its index.html page, you should see the Online Doctor Appointment Form. Fill out and submit this form, indicating the e-mail address where you would like to receive the New Patient Enrollment Form.
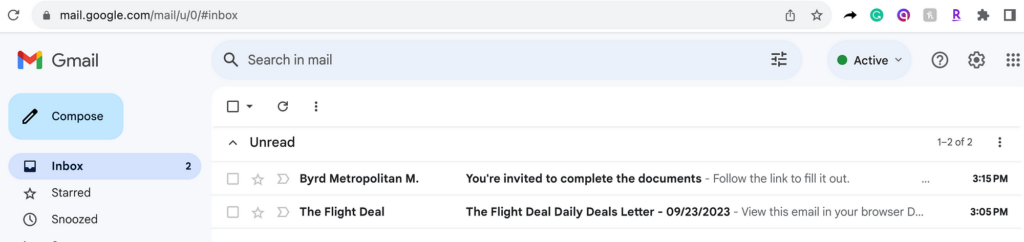
You will be redirected to the “welcome” page. You should also have promptly received an email inviting you to complete the New Patient Enrollment Form.
The New Patient Enrollment Form arrives with several of its fields pre-filled, as specified in its Flow.
If you’ve gotten to the end of this tutorial and built out this application, congratulations! Enjoy these lollipops and check out some other features in airSlate’s Document Automation Hub API.